前言:又到了一年一度的跳槽季,准备跳槽的你在关于Android面试方面的知识都完全掌握了吗?Android面试中经常被问到的知识——Android消息机制即Handler有关的问题你都能解释的清楚吗?如果你对Android消息机制比较模糊或者能够回答与Handler有关的问题但是不清楚其中的原理,那么你将会在本文得到你想要的答案。
阅读本文后的收货
阅读本文后你将会有以下收获:
- 清楚的理解Handler的工作原理
- 理清Handler、Message、MessageQueue以及Looper之间的关系
- 知道Looper是怎么和当前线程进行绑定的
- 是否能在子线程中创建Handler
- 获得分析Handler源码的思路
要想有以上的收获,就需要研究Handler的源码,从源码中来得到答案。
开始探索之路
Handler的使用
先从Handler的使用开始。我们都知道Android的主线程不能处理耗时的任务,否者会导致ANR的出现,但是界面的更新又必须要在主线程中进行,这样,我们就必须在子线程中处理耗时的任务,然后在主线程中更新UI。
但是,我们怎么知道子线程中的任务何时完成,又应该什么时候更新UI,又更新什么内容呢?为了解决这个问题,Android为我们提供了一个消息机制即Handler。下面就看下Handler的常见使用方式,代码如下
public class MainActivity extends AppCompatActivity implements View.OnClickListener {
    private Button mStartTask;

    @SuppressLint("HandlerLeak")
    private Handler mHandler = new Handler() {
        @Override
        public void handleMessage(Message msg) {
            super.handleMessage(msg);
            if (msg.what == 1) {
                Toast.makeText(MainActivity.this, "刷新UI、", Toast.LENGTH_SHORT).show();
            }
        }
    };

    @Override
    protected void onCreate(Bundle savedInstanceState) {
        super.onCreate(savedInstanceState);
        setContentView(R.layout.activity_main);
        initView();
    }

    private void initView() {
        mStartTask = findViewById(R.id.btn_start_task);
        mStartTask.setOnClickListener(this);
    }

    @Override
    public void onClick(View v) {
        switch (v.getId()) {
            case R.id.btn_start_task:
                new Thread(new Runnable() {
                    @Override
                    public void run() {
                        try {
                            Thread.sleep(1000);
                            mHandler.sendEmptyMessage(1);
                        } catch (InterruptedException e) {
                            e.printStackTrace();
                        }
                    }
                }).start();
                break;
        }
    }
}
可以看到在子线程中,让线程睡了一秒,来模仿耗时的任务,当耗时任务处理完之后,Handler会发送一个消息,然后我们可以在Handler的handleMessage方法中得到这个消息,得到消息之后就能够在handleMessage方法中更新UI了,因为handleMessage是在主线程中嘛。到这里就会有以下疑问了:
- Handler明明是在子线程中发的消息怎么会跑到主线程中了呢?
- Handler的发送消息handleMessage又是怎么接收到的呢?
带着这两个疑问,开始分析Handler的源码。
Handler的源码分析
先看下在我们实例化Handler的时候,Handler的构造方法中都做了那些事情,看代码
    final Looper mLooper;
    final MessageQueue mQueue;
    final Callback mCallback;
    final boolean mAsynchronous;

/**
     * Default constructor associates this handler with the {@link Looper} for the
     * current thread.
     *
     * If this thread does not have a looper, this handler won't be able to receive messages
     * so an exception is thrown.
     */
    public Handler() {
        this(null, false);
    }

/**
     * Use the {@link Looper} for the current thread with the specified callback interface
     * and set whether the handler should be asynchronous.
     *
     * Handlers are synchronous by default unless this constructor is used to make
     * one that is strictly asynchronous.
     *
     * Asynchronous messages represent interrupts or events that do not require global ordering
     * with respect to synchronous messages.  Asynchronous messages are not subject to
     * the synchronization barriers introduced by {@link MessageQueue#enqueueSyncBarrier(long)}.
     *
     * @param callback The callback interface in which to handle messages, or null.
     * @param async If true, the handler calls {@link Message#setAsynchronous(boolean)} for
     * each {@link Message} that is sent to it or {@link Runnable} that is posted to it.
     *
     * @hide
     */
    public Handler(Callback callback, boolean async) {
        if (FIND_POTENTIAL_LEAKS) {
            final Class<? extends Handler> klass = getClass();
            if ((klass.isAnonymousClass() || klass.isMemberClass() || klass.isLocalClass()) &&
                    (klass.getModifiers() & Modifier.STATIC) == 0) {
                Log.w(TAG, "The following Handler class should be static or leaks might occur: " +
                    klass.getCanonicalName());
            }
        }

        mLooper = Looper.myLooper();
        if (mLooper == null) {
            throw new RuntimeException(
                "Can't create handler inside thread that has not called Looper.prepare()");
        }
        mQueue = mLooper.mQueue;
        mCallback = callback;
        mAsynchronous = async;
    }
通过源码可以看到Handler的无参构造函数调用了两个参数的构造函数,而在两个参数的构造函数中就是将一些变量进行赋值。
看下下面的代码
 mLooper = Looper.myLooper();
        if (mLooper == null) {
            throw new RuntimeException(
                "Can't create handler inside thread that has not called Looper.prepare()");
        }
这里是通过Looper中的myLooper方法来获得Looper实例的,如果Looper为null的话就会抛异常,抛出的异常内容翻译过来就是
无法在未调用Looper.prepare()的线程内创建handler
从这句话中,我们可以知道,在调用Looper.myLooper()之前必须要先调用Looper.prepare()方法,现在来看下prepare方法中的内容,如下
 /** Initialize the current thread as a looper.
      * This gives you a chance to create handlers that then reference
      * this looper, before actually starting the loop. Be sure to call
      * {@link #loop()} after calling this method, and end it by calling
      * {@link #quit()}.
      */
    public static void prepare() {
        prepare(true);
    }

    private static void prepare(boolean quitAllowed) {
        if (sThreadLocal.get() != null) {
            throw new RuntimeException("Only one Looper may be created per thread");
        }
        sThreadLocal.set(new Looper(quitAllowed));
    }
从上面代码中可以看到,prepare()方法调用了prepare(boolean quitAllowed)方法,prepare(boolean quitAllowed) 方法中则是实例化了一个Looper,然后将Looper设置进sThreadLocal中,到了这里就有必要了解一下ThreadLocalle。
什么是ThreadLocal
ThreadLocal 为解决多线程程序的并发问题提供了一种新的思路。使用这个工具类可以很简洁地编写出优美的多线程程序。
当使用ThreadLocal 维护变量时,ThreadLocal 为每个使用该变量的线程提供独立的变量副本,所以每一个线程都可以独立地改变自己的副本,而不会影响其它线程所对应的副本。
如果看完上面这段话还是搞不明白ThreadLocal有什么用,那么可以看下下面代码运行的结果,相信看下结果你就会明白ThreadLocal有什么作用了。
public class MainActivity extends AppCompatActivity {

    private static final String TAG = "MainActivity";
    private ThreadLocal<Integer> mThreadLocal = new ThreadLocal<>();

    @SuppressLint("HandlerLeak")
    private Handler mHandler = new Handler(){
        @Override
        public void handleMessage(Message msg) {
            super.handleMessage(msg);
            if (msg.what == 1) {
                Log.d(TAG, "onCreate: "+mThreadLocal.get());
            }
        }
    };

    @Override
    protected void onCreate(Bundle savedInstanceState) {
        super.onCreate(savedInstanceState);
        setContentView(R.layout.activity_main);
        mThreadLocal.set(5);

        Thread1 thread1 = new Thread1();
        thread1.start();

        Thread2 thread2 = new Thread2();
        thread2.start();

        Thread3 thread3 = new Thread3();
        thread3.start();

        new Thread(new Runnable() {
            @Override
            public void run() {
                try {
                    Thread.sleep(2000);
                    mHandler.sendEmptyMessage(1);
                } catch (InterruptedException e) {
                    e.printStackTrace();
                }
            }
        }).start();
    }

    class Thread1 extends Thread {

        @Override
        public void run() {
            super.run();
            mThreadLocal.set(1);
            Log.d(TAG, "mThreadLocal1: "+ mThreadLocal.get());
        }
    }

    class Thread2 extends Thread {

        @Override
        public void run() {
            super.run();
            mThreadLocal.set(2);
            Log.d(TAG, "mThreadLocal2: "+ mThreadLocal.get());
        }
    }

    class Thread3 extends Thread {

        @Override
        public void run() {
            super.run();
            mThreadLocal.set(3);
            Log.d(TAG, "mThreadLocal3: "+ mThreadLocal.get());
        }
    }
}
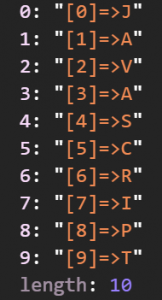
看下这段代码运行之后打印的log

可以看到虽然在不同的线程中对同一个mThreadLocal中的值进行了更改,但最后仍可以正确拿到当前线程中mThreadLocal中的值。由此我们可以得出结论ThreadLocal.set方法设置的值是与当前线程进行绑定了的。
知道了ThreadLocal.set方法的作用,则Looper.prepare方法就是将Looper与当前线程进行绑定(当前线程就是调用Looper.prepare方法的线程)。
文章到了这里我们可以知道以下几点信息了
- 在对Handler进行实例化的时候,会对一些变量进行赋值。
- 对Looper进行赋值是通过Looper.myLooper方法,但在调用这句代码之前必须已经调用了Looper.prepare方法。
- Looper.prepare方法的作用就是将实例化的Looper与当前的线程进行绑定。
这里就又出现了一个问题:在调用Looper.myLooper方法之前必须必须已经调用了Looper.prepare方法,即在实例化Handler之前就要调用Looper.prepare方法,但是我们平常在主线程中使用Handler的时候并没有调用Looper.prepare方法呀!这是怎么回事呢?
其实,在主线程中Android系统已经帮我们调用了Looper.prepare方法,可以看下ActivityThread类中的main方法,代码如下
 public static void main(String[] args) {
        Trace.traceBegin(Trace.TRACE_TAG_ACTIVITY_MANAGER, "ActivityThreadMain");

        // CloseGuard defaults to true and can be quite spammy.  We
        // disable it here, but selectively enable it later (via
        // StrictMode) on debug builds, but using DropBox, not logs.
        CloseGuard.setEnabled(false);

        Environment.initForCurrentUser();

        // Set the reporter for event logging in libcore
        EventLogger.setReporter(new EventLoggingReporter());

        // Make sure TrustedCertificateStore looks in the right place for CA certificates
        final File configDir = Environment.getUserConfigDirectory(UserHandle.myUserId());
        TrustedCertificateStore.setDefaultUserDirectory(configDir);

        Process.setArgV0("<pre-initialized>");

        Looper.prepareMainLooper();

        ActivityThread thread = new ActivityThread();
        thread.attach(false);

        if (sMainThreadHandler == null) {
            sMainThreadHandler = thread.getHandler();
        }

        if (false) {
            Looper.myLooper().setMessageLogging(new
                    LogPrinter(Log.DEBUG, "ActivityThread"));
        }

        // End of event ActivityThreadMain.
        Trace.traceEnd(Trace.TRACE_TAG_ACTIVITY_MANAGER);
        Looper.loop();

        throw new RuntimeException("Main thread loop unexpectedly exited");
    }
上面的代码中有一句
Looper.prepareMainLooper();
这句话的实质就是调用了Looper的prepare方法,代码如下
 public static void prepareMainLooper() {
        prepare(false);//这里调用了prepare方法
        synchronized (Looper.class) {
            if (sMainLooper != null) {
                throw new IllegalStateException("The main Looper has already been prepared.");
            }
            sMainLooper = myLooper();
        }
    }
到这里就解决了,为什么我们在主线程中使用Handler之前没有调用Looper.prepare方法的问题了。
让我们再回到Handler的构造方法中,看下
mLooper = Looper.myLooper();
myLooper()方法中代码如下
/**
     * Return the Looper object associated with the current thread.  Returns
     * null if the calling thread is not associated with a Looper.
     */
    public static @Nullable Looper myLooper() {
        return sThreadLocal.get();
    }
其实就是从当前线程中的ThreadLocal中取出Looper实例。
再看下Handler的构造方法中的
mQueue = mLooper.mQueue;
这句代码。这句代码就是拿到Looper中的mQueue这个成员变量,然后再赋值给Handler中的mQueue,下面看下Looper中的代码
 final MessageQueue mQueue;

    private Looper(boolean quitAllowed) {
        mQueue = new MessageQueue(quitAllowed);
        mThread = Thread.currentThread();
    }
同过上面的代码,我们可以知道mQueue就是MessageQueue,在我们调用Looper.prepare方法时就将mQueue实例化了。
Handler的sendMessage方法都做了什么
还记得文章开始时的两个问题吗?
- Handler明明是在子线程中发的消息怎么会跑到主线程中了呢?
- Handler的发送消息handleMessage又是怎么接收到的呢?
下面就分析一下Handler的sendMessage方法都做了什么,看代码
public final boolean sendMessage(Message msg)
    {
        return sendMessageDelayed(msg, 0);
    }

public final boolean sendMessageDelayed(Message msg, long delayMillis)
    {
        if (delayMillis < 0) {
            delayMillis = 0;
        }
        return sendMessageAtTime(msg, SystemClock.uptimeMillis() + delayMillis);
    }

/**
     * Enqueue a message into the message queue after all pending messages
     * before the absolute time (in milliseconds) <var>uptimeMillis</var>.
     * <b>The time-base is {@link android.os.SystemClock#uptimeMillis}.</b>
     * Time spent in deep sleep will add an additional delay to execution.
     * You will receive it in {@link #handleMessage}, in the thread attached
     * to this handler.
     *
     * @param uptimeMillis The absolute time at which the message should be
     *         delivered, using the
     *         {@link android.os.SystemClock#uptimeMillis} time-base.
     *
     * @return Returns true if the message was successfully placed in to the
     *         message queue.  Returns false on failure, usually because the
     *         looper processing the message queue is exiting.  Note that a
     *         result of true does not mean the message will be processed -- if
     *         the looper is quit before the delivery time of the message
     *         occurs then the message will be dropped.
     */
    public boolean sendMessageAtTime(Message msg, long uptimeMillis) {
        MessageQueue queue = mQueue;
        if (queue == null) {
            RuntimeException e = new RuntimeException(
                    this + " sendMessageAtTime() called with no mQueue");
            Log.w("Looper", e.getMessage(), e);
            return false;
        }
        return enqueueMessage(queue, msg, uptimeMillis);
    }
由上面的代码可以看出,Handler的sendMessage方法最后调用了sendMessageAtTime这个方法,其实,无论时sendMessage、sendEmptyMessage等方法最终都是调用sendMessageAtTime。可以看到sendMessageAtTime这个方法最后返回的是enqueueMessage(queue, msg, uptimeMillis);下面看下这个方法,代码如下
private boolean enqueueMessage(MessageQueue queue, Message msg, long uptimeMillis) {
        msg.target = this;
        if (mAsynchronous) {
            msg.setAsynchronous(true);
        }
        return queue.enqueueMessage(msg, uptimeMillis);
    }
这里有一句代码非常重要,
msg.target = this;
这句代码就是将当前的Handler赋值给了Message中的target变量。这样,就将每个调用sendMessage方法的Handler与Message进行了绑定。
enqueueMessage方法最后返回的是queue.enqueueMessage(msg, uptimeMillis);也就是调用了MessageQueue中的enqueueMessage方法,下面看下MessageQueue中的enqueueMessage方法,代码如下
boolean enqueueMessage(Message msg, long when) {
        if (msg.target == null) {
            throw new IllegalArgumentException("Message must have a target.");
        }
        if (msg.isInUse()) {
            throw new IllegalStateException(msg + " This message is already in use.");
        }

        synchronized (this) {
            if (mQuitting) {
                IllegalStateException e = new IllegalStateException(
                        msg.target + " sending message to a Handler on a dead thread");
                Log.w(TAG, e.getMessage(), e);
                msg.recycle();
                return false;
            }

            msg.markInUse();
            msg.when = when;
            Message p = mMessages;
            boolean needWake;
            if (p == null || when == 0 || when < p.when) {
                // New head, wake up the event queue if blocked.
                msg.next = p;
                mMessages = msg;
                needWake = mBlocked;
            } else {
                // Inserted within the middle of the queue.  Usually we don't have to wake
                // up the event queue unless there is a barrier at the head of the queue
                // and the message is the earliest asynchronous message in the queue.
                needWake = mBlocked && p.target == null && msg.isAsynchronous();
                Message prev;
                for (;;) {
                    prev = p;
                    p = p.next;
                    if (p == null || when < p.when) {
                        break;
                    }
                    if (needWake && p.isAsynchronous()) {
                        needWake = false;
                    }
                }
                msg.next = p; // invariant: p == prev.next
                prev.next = msg;
            }

            // We can assume mPtr != 0 because mQuitting is false.
            if (needWake) {
                nativeWake(mPtr);
            }
        }
        return true;
    }
上面的代码就是将消息放进消息队列中,如果消息已成功放入消息队列,则返回true。失败时返回false,而失败的原因通常是因为处理消息队列正在退出。代码分析到这里可以得出以下两点结论了
- Handler在sendMessage时会将自己设置给Message的target变量即将自己与发送的消息绑定。
- Handler的sendMessage是将Message放入MessageQueue中。
到了这里已经知道Handler的sendMessage是将消息放进MessageQueue中,那么又是怎样从MessageQueue中拿到消息的呢?想要知道答案请继续阅读。
怎样从MessageQueue中获取Message
在文章的前面,贴出了ActivityThread类中的main方法的代码,不知道细心的你有没有注意到,在main方法的结尾处调用了一句代码
Looper.loop();
好了,现在可以看看Looper.loop();这句代码到底做了什么了loop方法中的代码如下
/**
     * Run the message queue in this thread. Be sure to call
     * {@link #quit()} to end the loop.
     */
    public static void loop() {
        final Looper me = myLooper();//通过myLooper方法拿到与主线程绑定的Looper
        if (me == null) {
            throw new RuntimeException("No Looper; Looper.prepare() wasn't called on this thread.");
        }
        final MessageQueue queue = me.mQueue;//从Looper中得到MessageQueue

        // Make sure the identity of this thread is that of the local process,
        // and keep track of what that identity token actually is.
        Binder.clearCallingIdentity();
        final long ident = Binder.clearCallingIdentity();

        //开始死循环
        for (;;) {
            //从消息队列中不断取出消息
            Message msg = queue.next(); // might block
            if (msg == null) {
                // No message indicates that the message queue is quitting.
                return;
            }

            // This must be in a local variable, in case a UI event sets the logger
            final Printer logging = me.mLogging;
            if (logging != null) {
                logging.println(">>>>> Dispatching to " + msg.target + " " +
                        msg.callback + ": " + msg.what);
            }

            final long slowDispatchThresholdMs = me.mSlowDispatchThresholdMs;

            final long traceTag = me.mTraceTag;
            if (traceTag != 0 && Trace.isTagEnabled(traceTag)) {
                Trace.traceBegin(traceTag, msg.target.getTraceName(msg));
            }
            final long start = (slowDispatchThresholdMs == 0) ? 0 : SystemClock.uptimeMillis();
            final long end;
            try {
                //这句代码是重点
                msg.target.dispatchMessage(msg);
                end = (slowDispatchThresholdMs == 0) ? 0 : SystemClock.uptimeMillis();
            } finally {
                if (traceTag != 0) {
                    Trace.traceEnd(traceTag);
                }
            }
            if (slowDispatchThresholdMs > 0) {
                final long time = end - start;
                if (time > slowDispatchThresholdMs) {
                    Slog.w(TAG, "Dispatch took " + time + "ms on "
                            + Thread.currentThread().getName() + ", h=" +
                            msg.target + " cb=" + msg.callback + " msg=" + msg.what);
                }
            }

            if (logging != null) {
                logging.println("<<<<< Finished to " + msg.target + " " + msg.callback);
            }

            // Make sure that during the course of dispatching the
            // identity of the thread wasn't corrupted.
            final long newIdent = Binder.clearCallingIdentity();
            if (ident != newIdent) {
                Log.wtf(TAG, "Thread identity changed from 0x"
                        + Long.toHexString(ident) + " to 0x"
                        + Long.toHexString(newIdent) + " while dispatching to "
                        + msg.target.getClass().getName() + " "
                        + msg.callback + " what=" + msg.what);
            }

            msg.recycleUnchecked();
        }
    }
上面的代码,我已经进行了部分注释,这里有一句代码非常重要
msg.target.dispatchMessage(msg);
执行到这句代码,说明已经从消息队列中拿到了消息,还记得msg.target吗?就是Message中的target变量呀!也就是发送消息的那个Handler,所以这句代码的本质就是调用了Handler中的dispatchMessage(msg)方法,代码分析到这里是不是有点小激动了呢!稳住!下面看下dispatchMessage(msg)这个方法,代码如下
/**
     * Handle system messages here.
     */
    public void dispatchMessage(Message msg) {
        if (msg.callback != null) {
            handleCallback(msg);
        } else {
            if (mCallback != null) {
                if (mCallback.handleMessage(msg)) {
                    return;
                }
            }
            handleMessage(msg);
        }
    }
现在来一句句的来分析上面的代码,先看下这句
if (msg.callback != null) {
            handleCallback(msg);
        }
msg.callback就是Runnable对象,当msg.callback不为null时会调用 handleCallback(msg)方法,先来看下 handleCallback(msg)方法,代码如下
 private static void handleCallback(Message message) {
        message.callback.run();
    }
上面的代码就是调用了Runnable的run方法。那什么情况下if (msg.callback != null)这个条件成立呢!还记得使用Handler的另一种方法吗?就是调用Handler的post方法呀!这里说明一下,使用Handler其实是有两种方法的
- 使用Handler的sendMessage方法,最后在handleMessage(Message msg)方法中来处理消息。
- 使用Handler的post方法,最后在Runnable的run方法中来处理,代码如下
public class MainActivity extends AppCompatActivity implements View.OnClickListener {
    private Button mTimeCycle,mStopCycle;
    private Runnable mRunnable;

    @Override
    protected void onCreate(Bundle savedInstanceState) {
        super.onCreate(savedInstanceState);
        setContentView(R.layout.activity_main);
        initView();
    }

    private void initView() {
        mTimeCycle = findViewById(R.id.btn_time_cycle);
        mTimeCycle.setOnClickListener(this);
        mStopCycle = findViewById(R.id.btn_stop_cycle);
        mStopCycle.setOnClickListener(this);

        mRunnable = new Runnable() {
            @Override
            public void run() {
                Toast.makeText(MainActivity.this, "正在循环!!!", Toast.LENGTH_SHORT).show();
                mHandler.postDelayed(mRunnable, 1000);
            }
        };
    }

    @Override
    public void onClick(View v) {
        switch (v.getId()) {
            case R.id.btn_time_cycle:
                mHandler.post(mRunnable);
                break;
            case R.id.btn_stop_cycle:
                mHandler.removeCallbacks(mRunnable);
                break;
        }
    }
}
第一种方法,我们已经分析了,下面来分析一下第二种使用方式的原理,先看下Handler的post的方法做了什么,代码如下
/**
     * Causes the Runnable r to be added to the message queue.
     * The runnable will be run on the thread to which this handler is
     * attached.
     *
     * @param r The Runnable that will be executed.
     *
     * @return Returns true if the Runnable was successfully placed in to the
     *         message queue.  Returns false on failure, usually because the
     *         looper processing the message queue is exiting.
     */
    public final boolean post(Runnable r)
    {
       return  sendMessageDelayed(getPostMessage(r), 0);
    }

 private static Message getPostMessage(Runnable r) {
        Message m = Message.obtain();
        m.callback = r;
        return m;
    }
由上面的代码不难看出,post方法最终也是将Runnable封装成消息,然后将消息放进MessageQueue中。下面继续分析dispatchMessage方法中的代码
else {
            //if中的代码其实是和if (msg.callback != null) {handleCallback(msg);}
            //原理差不多的,只不过mCallback是Handler中的成员变量。
            if (mCallback != null) {
                if (mCallback.handleMessage(msg)) {
                    return;
                }
            }
    //当上面的条件都不成立时,就会调用这句代码
            handleMessage(msg);
        }
上面的代码就不分析了,我已经在代码中进行了注释,下面再看下handleMessage(msg)这个方法,代码如下
/**
     * Subclasses must implement this to receive messages.
     */
    public void handleMessage(Message msg) {
    }
其实,他就是一个空方法,具体的代码让我们自己重写这个方法进行处理。代码分析到这里,已经可以给出下面问题的答案了。
- Handler明明是在子线程中发的消息怎么会跑到主线程中了呢?
- Handler的发送消息handleMessage又是怎么接收到的呢?
在子线程中Handler在发送消息的时候已经把自己与当前的message进行了绑定,在通过Looper.loop()开启轮询message的时候,当获得message的时候会调用 与之绑定的Handler的handleMessage(Message msg)方法,由于Handler是在主线程创建的,所以自然就由子线程切换到了主线程。
总结
上面已经嗯将Handler的源码分析了一遍,现在来进行一些总结:
1、Handler的工作原理
在使用Handler之前必须要调用Looper.prepare()这句代码,这句代码的作用是将Looper与当前的线程进行绑定,在实例化Handler的时候,通过Looper.myLooper()获取Looper,然后再获得Looper中的MessageQueue。
在子线程中调用Handler的sendMessage方法就是将Message放入MessageQueue中,然后调用Looper.loop()方法来从MessageQueue中取出Message,在取到Message的时候,执行 msg.target.dispatchMessage(msg);这句代码,这句代码就是从当前的Message中取出Handler然后执行Handler的handleMessage方法。
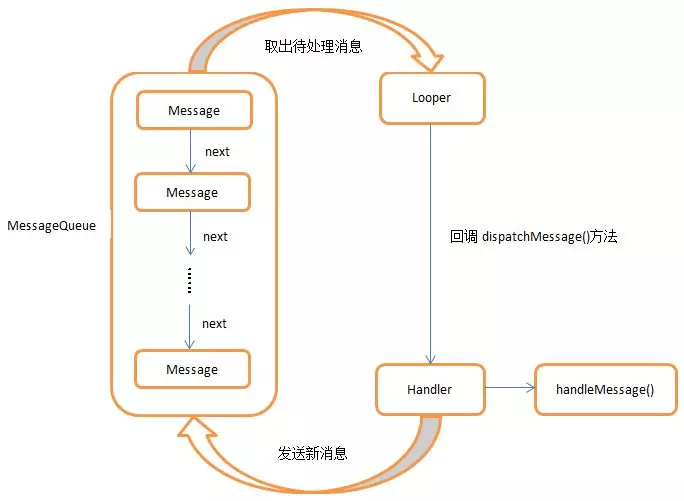
2、Handler、Message、MessageQueue以及Looper之间的关系
在介绍它们之间的关系之前,先说一下它们各自的作用。
- Handler:负责发送和处理消息。
- Message:用来携带需要的数据。
- MessageQueue:消息队列,队列里面的内容就是Message。
- Looper:消息轮巡器,负责不停的从MessageQueue中取Message。
它们的关系如下图(图片来源于网上)
3、在子线程中使用Handler
在子线程中使用Handler的方式如下
class LooperThread extends Thread {
    public Handler mHandler;
    public void run() {
        Looper.prepare();
        mHandler = new Handler() {
            public void handleMessage(Message msg) {
                // process incoming messages here
            }
        };
        Looper.loop();
    }
}
上面的代码来自官方的源码。
结束语
本文将Handler的机制详细讲解了一遍,包括在面试中有关Handler的一些问题,在文章中也能找到答案。
顺便说下阅读代码应该注意的地方,在分析源码之前应该知道你分析代码的目的,就是你为了得到什么答案而分析代码;在分析代码时切记要避轻就重,不要想着要搞懂每句代码做了什么,要找准大方向。文中的代码已上传到GitHub,可以在这里获取,与Handler有关的源码在我上传的源码的handler包中
技术博客阅读排行
-

2016-09-10
-

使用C ++ 11线程支持库创建带有事件循环,消息队列和计时器的辅助线程
2020-09-14
-

快速集成MQTT协议到Android客户端,只需要简单的几个步骤,无需关
2016-09-22
-

2021-01-24
-

2020-12-20
-

2018-04-01
-
2020-08-02
-

2017-01-05
最新文章
-
React Native 启动速度优化――JS 篇【全网最全,值得收藏】
2021-04-19
-
2021-01-24
-
2020-12-20
-

2020-12-19
-
2020-09-14
-
使用C ++ 11线程支持库创建带有事件循环,消息队列和计时器的辅助线程
2020-09-14
-

2020-08-29
-
2020-08-09
热门源码
