1 前言
插件化算是比较复杂的一个话题。刚一接触的时候,我是一脸懵逼的,网上看了很多博客,一直是似懂非懂,不得其要领。期间也尝试看了Small,也是知其然不知其所以然。
就此搁置一段时间,直到真正拿出勇气,尝试自己实现插件化,成功加载了四大组件之一Activity。这才明白它的背后究竟做了什么,以及为什么这么做。
希望借着这篇文章,谈谈自己的理解。也希望通过我的小 Demo,能帮大家更轻松的理解诸如Small、VirtualApk、Atlas之类的大型框架。如有纰漏,请留言指出。
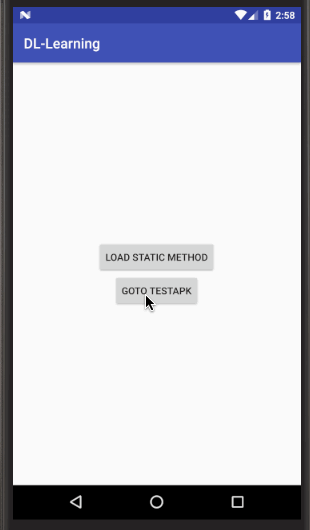
2 效果预览
主apk[com.fashare.app.MainActivity]唤起sd卡上的插件apk[com.fashare.testapk.PluginActivity] :
3 源码
https://github.com/fashare2015/Dynamic-Load-Learning
4 原理与实现
Activity 的加载,可以分为「类加载」和「资源加载」两个主题。
考虑到篇幅比较长,本文主要讨论「类加载」。
「资源加载」将放到下一篇文章中探讨。
4.1 类加载
根据 Java 的类加载机制,我们知道,JVM 通过ClassLoader来加载 jar 包中的 .class 文件。并且我们需要注意两点:
- 一个 .class 文件 + 一个 ClassLoader 唯一确定一个 java 类
- 请遵循 双亲委派模型
「双亲委派模型」通俗的讲就是,系统类诸如java.*全都委派给 JVM 默认的 Bootstrap ClassLoader 加载,其他的由用户自定义的 ClassLoader 加载。这样可以保护java.*下的类,并确保系统类的唯一性。否则,会出现 yourClassLoader.loadClass("java.lang.String") != String.class
于是,Android 提供了两类自定义的 ClassLoader 来加载 dex 中的 .class 文件。
- PathClassLoader 只能加载已安装(data/app/目录下)的apk
- DexClassLoader 可以加载外部(sd卡上)的apk
如下图,打开我们的 demo 可以看到,它被安装到data/app/下。然后由PathClassLoader来加载其中的所有类。
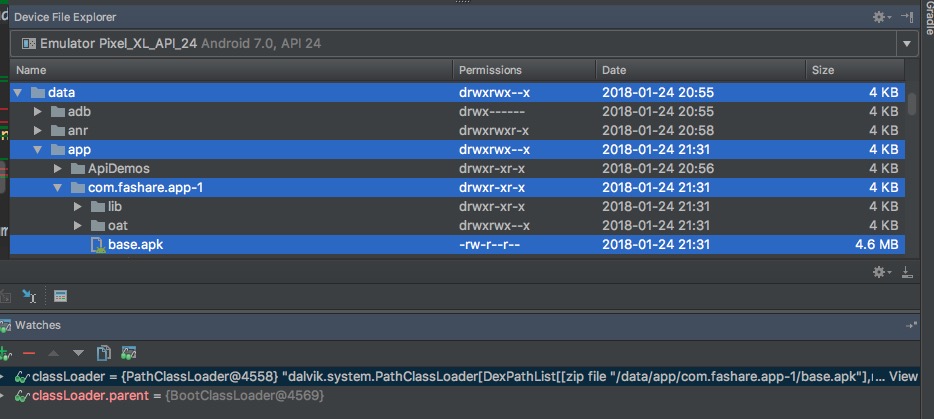
AS 3.0 可以预览手机上的文件,非常方便。
4.1.1 创建插件专用的 DexClassLoader
由于要加载外部的插件 apk,你大概猜到了,我们得用 new 一个DexClassLoader来加载插件 apk 中的类。
1 2 3 4 5 6 7 8 9 10 11 12 13 14 15 16 17 18 19 20 21 22 23 24 25 26 27 28 |
package dalvik.system; /** * A class loader that loads classes from {@code .jar} and {@code .apk} files * containing a {@code classes.dex} entry. This can be used to execute code not * installed as part of an application. */ public class extends { /** * Creates a {@code DexClassLoader} that finds interpreted and native * code. Interpreted classes are found in a set of DEX files contained * in Jar or APK files. * * @param dexPath the list of jar/apk files containing classes and * resources, delimited by {@code File.pathSeparator}, which * defaults to {@code ":"} on Android * @param optimizedDirectory directory where optimized dex files * should be written; must not be {@code null} * @param librarySearchPath the list of directories containing native * libraries, delimited by {@code File.pathSeparator}; may be * {@code null} * @param parent the parent class loader */ public (String dexPath, String optimizedDirectory, String librarySearchPath, ClassLoader parent) { super(dexPath, new File(optimizedDirectory), librarySearchPath, parent); } } |
看一眼它的注释,大意是说「它可以加载 .jar/.apk 中未安装的代码作为 app 的一部分」。其中四个参数分别为:
- dexPath:插件 apk 的路径
- optimizedDirectory: 需指定一个缓存目录
- librarySearchPath: native lib,暂时不太需要,直接给 null
-
parent: 根据「双亲委派模型」,应该给它宿主 apk 默认的
PathClassLoader。
于是,我们这样先 new 一个 dexClassLoader 备用:
1 2 3 4 5 6 7 8 9 10 11 12 13 14 15 16 17 18 19 20 21 |
package com.fashare.dl /** * 动态加载(门面类) */ object DL { lateinit var dexClassLoader: DexClassLoader /** * 加载 sdcard 上的 未安装的 apk */ fun (context: Context, pluginUri: Uri) { dexClassLoader = DexClassLoader( pluginUri.path, context.cacheDir.path, null, context.classLoader) } ... } |
然后在主 app 的 Application 里调用一下:
1 2 3 4 5 6 7 8 9 10 11 |
package com.fashare.app class App: Application(){ override fun () { super.onCreate() val pluginFile = File(Environment.getExternalStorageDirectory(), "testapk-with-res.apk") copyTestApkToSdcard(pluginFile) DL.loadApk(this, Uri.fromFile(pluginFile)) } } |
4.1.2 用 dexClassLoader 加载插件中的 Activity
已经有了 dexClassLoader,我们需要在
合适的时机加载插件里的 Activity。
研究一发 Activity 启动流程,我们会发现 Activity 从创建到销毁都会经过Instrumentation这个类。它非常重要,后面会经常和它打交道。
我们平常在 Manifest 里注册的 Activity 类名,最终会走到Instrumentation.newActivity,然后反射出 Activity 实例。
所以,我们只需 hack 掉这个方法,new 出我们想要的 Activity 即可。
1 2 3 4 5 6 7 8 9 |
package android.app; public class { ... public Activity (ClassLoader cl, String className, Intent intent) throws InstantiationException, IllegalAccessException, ClassNotFoundException { return (Activity)cl.loadClass(className).newInstance(); } } |
4.1.3 hack Instrumentation
我们一起来找这个 hack 点。
我们知道,ActivityThread,也就是我们常说的主线程,它是进程级别的单例。
我们发现,它刚好有一个 Instrumentation 的成员变量,且参与到startActivity等各种重要的流程中,把它换掉就行啦。
1 2 3 4 5 6 7 8 9 10 11 12 13 14 15 16 17 18 19 20 21 22 23 24 25 26 27 28 29 30 31 32 33 34 35 36 |
package android.app; public final class { // 单例 private static volatile ActivityThread sCurrentActivityThread; public static ActivityThread () { return sCurrentActivityThread; } Instrumentation mInstrumentation; public static void (String[] args) { ... // 我们常说的 Looper 的初始化 Looper.prepareMainLooper(); ActivityThread thread = new ActivityThread(); // 在 attach() 里,new 出了 Instrumentation,也是进程级别唯一的 thread.attach(false); ... Looper.loop(); } private void (boolean system) { sCurrentActivityThread = this; if (!system) { ... } else { ... mInstrumentation = new Instrumentation(); } ... } } |
于是,我们用反射搞一下,换成我们自定义的InstrumentationProxy。用它来代理原来的 Instrumentation:
1 2 3 4 5 6 7 8 9 10 11 12 13 14 15 16 17 18 |
package com.fashare.dl object DL { lateinit var dexClassLoader: DexClassLoader internal lateinit var instrumentation: Instrumentation fun (context: Context, uri: Uri) {...} /** * 替换 ActivityThread.mInstrumentation */ fun () { // 反射伪代码: val base = ActivityThread.currentActivityThread().mInstrumentation ActivityThread.currentActivityThread().mInstrumentation = InstrumentationProxy(base) } } |
InstrumentationProxy 其他不动,仅仅 override (hack) 掉 newActivity 这个方法。
1 2 3 4 5 6 7 8 9 10 11 12 |
package com.fashare.dl /** * Instrumentation 代理类 */ internal class (val base: Instrumentation) : () { override fun (cl: ClassLoader?, className: String?, intent: Intent?): Activity? { // 不用默认的 cl,而是用事先准备好的 DL.dexClassLoader 来加载 Activity。 return base.newActivity(DL.dexClassLoader, className, intent) } } |
哈哈,到此为止,我们的 Activity 类加载已经完成啦。
注意此时的插件 Activity 只能是空 Activity,不能访问 R 资源(此时还没实现),但可以打 Log 以及 Toast。在主 app 里试用一下:
-
在 App.onCreate() 里调用
DL.replaceInstrumentation()—— 做 hack -
在 App.onCreate() 里调用
DL.loadApk(this, Uri.fromFile(pluginFile))—— 指定插件 apk 路径 -
在主 app 的 Manifest 里注册
com.fashare.testapk.PluginActivity -
在主 app 的 MainActivity 里调用
startActivity(Intent(this, DL.dexClassLoader.loadClass("com.fashare.testapk.PluginActivity")))。
应该可以看到,已经成功唤起插件 Activity 了,生命周期也照常被调用。
4.1.4 还没有结束
且看前面的第 3 步,如果使用插件还得把所有插件里的 Activity 事先在宿主 apk 里注册一遍,那一点也不动态啊。所以,我们看到的市面上的插件化框架都是不需要注册 Activity 的,我们也想办法优化掉这一步。
直接上结论吧,startActivity() 走到 AMS 的时候,它会检查目标 Activity 是否注册过,并拦截掉未注册的 Activity。说实话,这一段还没有仔细的去跟过。
于是呢,我们可以事先注册一个空 Activity,把 Intent 的目标 Activity 换成它,用它骗过 AMS 的检查。然后在 newActivity 的时候,new 我们真正需要的插件 Activity。(有点 ViewStub 的感觉?)
代码实现主要是 hack 掉 Instrumentation.execStartActivity
1 2 3 4 5 6 7 8 9 10 11 12 13 14 15 16 17 18 19 20 21 22 23 24 25 26 27 28 29 30 31 32 33 34 35 36 37 38 39 40 41 42 43 44 45 46 47 48 49 |
package com.fashare.dl /** * Intent 代理类,替换 component.className 为 StubActivity */ internal class (var base: Intent?) : () { init { component = ComponentName(base?.component?.packageName, StubActivity::class..) } } /** * 占坑用 */ internal class StubActivity : AppCompatActivity() internal class (val base: Instrumentation) : () { var mIntentProxy: IntentProxy? = null /** * new 之前,取出原始的 intent 来 new Activity实例 */ override fun (cl: ClassLoader?, className: String?, intent: Intent?): Activity? { return (mIntentProxy?.base ?: intent)?.let { mIntentProxy = null base.newActivity(DL.dexClassLoader, it.component?.className, it) } } /** * start 之前,替换 Intent 为 已注册的 StubActivity, 以绕过 系统对 manifest 的检查 * * 注: 这里其实也是 override, 只是 super.execStartActivity(...) 为 @hide, 所以看起来比较奇怪. */ fun ( who: Context?, contextThread: IBinder?, token: IBinder?, target: Activity?, intent: Intent?, requestCode: Int, options: Bundle?): ActivityResult? { mIntentProxy = IntentProxy(intent) return try { Reflect.on(base).call("execStartActivity", who, contextThread, token, target, mIntentProxy, requestCode, options).get<ActivityResult?>() } catch (e: Exception) { null } } } |
4.1.5 类加载小结
类加载告一段落,弄透重要的几点,再去看那些成熟的框架,会轻松很多:
- DexClassLoader
- hack Instrumentation
- Actiivty(四大组件)占坑
技术博客阅读排行
-

2016-09-10
-

使用C ++ 11线程支持库创建带有事件循环,消息队列和计时器的辅助线程
2020-09-14
-

快速集成MQTT协议到Android客户端,只需要简单的几个步骤,无需关
2016-09-22
-

2021-01-24
-

2020-12-20
-

2018-04-01
-
2020-08-02
-

2017-01-05
最新文章
-
React Native 启动速度优化――JS 篇【全网最全,值得收藏】
2021-04-19
-
2021-01-24
-
2020-12-20
-

2020-12-19
-
2020-09-14
-
使用C ++ 11线程支持库创建带有事件循环,消息队列和计时器的辅助线程
2020-09-14
-

2020-08-29
-
2020-08-09
热门源码
