本篇能学到什么 Kotlin配合Rxjava+Retrofit+缓存策略进行网络请求 Kotlin Retrofit简单封装 Kotlin使用单例模式 开始 Kotlin配合Rxjava+Retrofit+缓存策略进行网络请求 网络请求基本上每个应用App都要具备的需求之一,网络请求库也有许多,Android源码中用 j
本篇能学到什么
Kotlin配合Rxjava+Retrofit+缓存策略进行网络请求
Kotlin Retrofit简单封装
Kotlin使用单例模式
开始
Kotlin配合Rxjava+Retrofit+缓存策略进行网络请求
网络请求基本上每个应用App都要具备的需求之一,网络请求库也有许多,
Android源码中用
java来进行网络请求大家恐怕都比较熟悉,那么Kotlin呢,其实也很简单,抄家伙……Kotlin的配置这里就不在说啦,不清楚的小伙伴可以看我之前的博客:Kotlin在Android Studio中的配置
1.首先依赖库
/*网络依赖*/
compile 'com.squareup.retrofit2:retrofit:2.1.0'
compile 'com.squareup.retrofit2:adapter-rxjava:2.1.0'
compile 'com.squareup.retrofit2:converter-gson:2.1.0'
compile 'com.squareup.okhttp3:okhttp:3.2.0'
compile 'com.squareup.okhttp3:logging-interceptor:3.2.0'
// rxjava
compile 'io.reactivex:rxandroid:1.1.0'
compile 'io.reactivex:rxjava:1.1.0'
/*图片处理*/
compile 'com.github.bumptech.glide:glide:3.7.0'
2.Kotlin的配置略
Kotlin Retrofit简单封装
率性耿直的Body直接上代码,没什么不好理解的,跟Java封装的差别不太大,注释写的也比较详细
package com.example.kotlin.http
import com.example.kotlin.MyApplication
import com.example.kotlin.bean.Banner
import com.example.kotlin.util.NetWorkUtil
import okhttp3.*
import okhttp3.logging.HttpLoggingInterceptor
import retrofit2.Retrofit
import retrofit2.adapter.rxjava.RxJavaCallAdapterFactory
import retrofit2.converter.gson.GsonConverterFactory
import rx.Observable
import java.io.File
import java.util.concurrent.TimeUnit
/**
* 作者:Tangren on 2017/5/23 17:48
* 邮箱:wu_tangren@163.com
* TODO:RetrofitManager
*/
class RetrofitManager private constructor(url: String) : Interceptor {
//短缓存有效期为10分钟
val CACHE_STALE_SHORT = 60 * 10
//长缓存有效期为7天
val CACHE_STALE_LONG="60 * 60 * 24 * 7"
//查询缓存的Cache-Control设置,为if-only-cache时只查询缓存而不会请求服务器,max-stale可以配合设置缓存失效时间
val CACHE_CONTROL_CACHE = "only-if-cached, max-stale=" + CACHE_STALE_LONG
//查询网络的Cache-Control设置,头部Cache-Control设为max-age=0时则不会使用缓存而请求服务器
val CACHE_CONTROL_NETWORK = "max-age=0"
var mOkHttpClient: OkHttpClient? = null
var service: APIService? = null
//初始化
init {
initOkHttpclient()
var retrofit = Retrofit.Builder()
.baseUrl(url)
.client(mOkHttpClient)
.addCallAdapterFactory(RxJavaCallAdapterFactory.create())
.addConverterFactory(GsonConverterFactory.create())
.build()
service = retrofit.create(APIService::class.java)
}
companion object {
fun builder(url: String): RetrofitManager {
println(RetrofitManager.javaClass.classes)
return RetrofitManager(url)
}
}
//配置缓存策略
fun initOkHttpclient() {
val interceptor = HttpLoggingInterceptor()
interceptor.level = HttpLoggingInterceptor.Level.BODY
if (mOkHttpClient == null) {
val cache = Cache(File(MyApplication.getInstance().cacheDir, "File_Kotlin"), 14 * 1024 * 100)
mOkHttpClient = OkHttpClient.Builder()
.cache(cache)
.retryOnConnectionFailure(true)
.addNetworkInterceptor(this)
.addInterceptor(this)
.connectTimeout(15, TimeUnit.SECONDS)
.build()
}
}
//云端响应头拦截器,用来适配缓存策略
override fun intercept(chain: Interceptor.Chain?): Response {
var request = chain!!.request()
if (!NetWorkUtil.isNetWorkConnected()) {
request = request.newBuilder().cacheControl(CacheControl.FORCE_CACHE).build()
}
var response = chain.proceed(request)
if (NetWorkUtil.isNetWorkConnected()) {
var cacheControl: String = request.cacheControl().toString()
return response.newBuilder().header("Cache-Control", cacheControl)
.removeHeader("Pragma").build()
} else {
return response.newBuilder().header("Cache-Control", "public, only-if-cached, max-stale=" + CACHE_STALE_LONG)
.removeHeader("Pragma").build()
}
}
fun getBanner(): Observable<List<Banner>> = service!!.getHot()
}
APIService .kt
package com.example.kotlin.http
import com.example.kotlin.bean.Banner
import retrofit2.http.GET
import retrofit2.http.Headers
import rx.Observable
/**
* 作者:Tangren on 2017/5/23 19:12
* 邮箱:wu_tangren@163.com
* TODO:一句话描述
*/
interface APIService {
@Headers("Cache-Control: public, max-age=60 * 60 * 24 * 7")
@GET("/course_api/banner/query?type=1")
fun getHot(): Observable<List<Banner>>
}
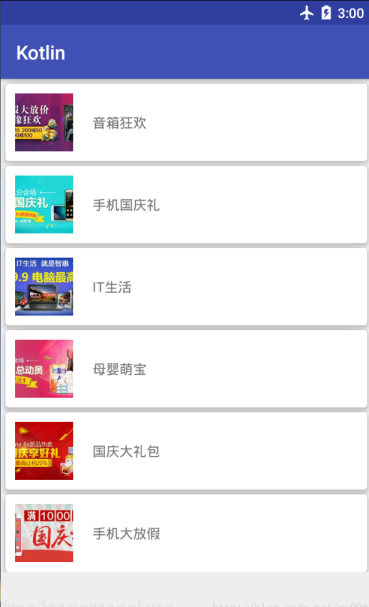
就在这时候RxJava突然来了(轰隆轰隆……)
fun getBanner() {
RetrofitManager.builder("http://112.124.22.238:8081")
.getBanner()
.subscribeOn(Schedulers.io())
.observeOn(AndroidSchedulers.mainThread())
.doOnSubscribe { println("call…………………………") }
.subscribe({ ban ->
println(ban.toString())
adapter!!.add(ban)
recyclerView.adapter = adapter
}) { throwable -> println(throwable.message) }
}
疲倦,有时候是劳累过后,虽然只有3秒……太快了,刹那间网络请求就可以了,就为你6不6,具体代码请移步到:代码在这里
Kotlin使用单例模式
java中使用单利模式有几种方式:一种是常用但不稳妥的懒汉式、一种是恶汉式写法但没有lazy loading,一种是静态内部类最后一种也是我常用的一种Double check 双重校验锁写法。具体代码就不详述了大家都比较清楚,Kotlin的单例模式跟java的实质是都是一样的。
1.懒汉模式:
java代码
public class Singleton {
private static Singleton singleton = new Singleton();
private Singleton() {}
public static Singleton getInstance() {
return singleton;
}
}
Kotlin代码
object Singleton{}
1
2.懒加载(非线程安全)
java代码
public class Singleton {
private static Singleton instance;
private Singleton() {
}
public static Singleton getInstance() {
if (instance == null) {
instance = new Singleton();
}
return instance;
}
}
Kotlin代码
Kotlin懒加载方式有两种:
第一种:
class Singleton {
companion object {
val instance by lazy(LazyThreadSafetyMode.NONE) {
Singleton()
}
}
}
第二种:
class Singleton {
private var instance: Singleton? = null
fun get(): Singleton {
if (instance == null) {
instance = Singleton()
}
return instance!!
}
}
在Kotlin中如果使用懒加载推荐使用第一种,但是懒加载方式不是线程安全的,有可能还会出现不止一个实例,那么请看线程安全方式
3.懒加载(线程安全)
java代码
public class Singleton {
private static Singleton instance;
private Singleton() {
}
public static synchronized Singleton getInstance() {
if (instance == null) {
instance = new Singleton();
}
return instance;
}
}
Kotlin代码
class Singleton private constructor() {
private var instance: Singleton? = null
@Synchronized
fun get(): Singleton {
if (instance == null) {
instance = Singleton()
}
return instance!!
}
}
但是这种加锁的方式是在每次都会,实际上只需要第一次调用才加锁,所以性能上稍微欠缺。
4.双重锁
java代码
public class Singleton {
private static volatile Singleton instance;
private Singleton() {
}
public static Singleton getInstance() {
if (instance == null) {
synchronized (Singleton.class) {
if(instance==null)
instance = new Singleton();
}
}
return instance;
}
}
Kotlin代码
第一种写法
class Singleton private constructor() {
companion object {
val instance by lazy(mode = LazyThreadSafetyMode.SYNCHRONIZED) {
Singleton()
}
}
}
第二种写法:
class Singleton private constructor() {
private @Volatile var instance: Singleton? = null
fun get(): Singleton {
if (instance == null) {
synchronized(this) {
if (instance == null) {
instance = Singleton()
}
}
}
return instance!!
}
}
5.最优雅的写法:静态内部类
java代码
public class Singleton {
private static class Holder {
private static Singleton instance = new Singleton();
}
private Singleton() {
}
public static Singleton getInstance() {
return Holder.instance;
}
}
Kotlin代码
class Singleton private constructor() {
companion object {
fun getInstance() = Holder.instance
}
private object Holder {
val instance = Singleton()
}
}
总结
学习Kotlin是一个循环渐进的过程,最近也没有太多的时间去研究,学习进度也相当的慢,暂时先分享这些。
Android Kotlin开发偶遇Rxjava、Retrofit进行网络请求
转载https://www.codesocang.com/appboke/39413.html