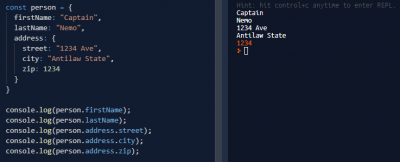
一直觉得bilibili的安卓客户端做的很不错,所以自己在项目中都会有意识或无意识地去模仿,最近觉得它的搜索框弹出收回的效果体验挺不错的,于是研究了一下模仿着做了一个:
bilibili搜索框效果图:

博主模仿版:

实现原理:
这里的波纹动画需要使用的ViewAnimationUtils库来实现,但是该库是5.0以后才引入的,所以无法满足低版本。但是不用担心,已经有开源库为我们实现了低版本的动画,用法和ViewAnimationUtils一致。
这里首先要介绍一个开源库circularReveal,主要是提供了波浪式的展开和回缩动画,利用这个库提供的动画再自定义一下就很容易实现上面的效果了
有兴趣的朋友可以自动降下源码看一下:
CircularReveal libaray源码下载
我这里就利用CircularReveal库,做了一个演示,就是上面的效果图的:
整个搜索框是使用片段实现的,弹出层是覆盖在活性上的一个片段,具体搜索逻辑自己去实现,演示只提供出入场动画:
先贴出片段的布局文件:
<?xml version="1.0" encoding="utf-8"?>
<LinearLayout xmlns:android="http://schemas.android.com/apk/res/android"
    android:id="@+id/root"
    android:layout_width="match_parent"
    android:layout_height="match_parent"
    android:orientation="vertical">

    <io.codetail.widget.RevealFrameLayout
        android:layout_width="match_parent"
        android:layout_height="wrap_content"
        android:layout_gravity="center_horizontal"
        android:layout_margin="7dp">

        <LinearLayout
            android:id="@+id/content"
            android:layout_width="match_parent"
            android:layout_height="match_parent"
            android:orientation="vertical">

            <io.codetail.widget.RevealLinearLayout
                android:layout_width="match_parent"
                android:layout_height="wrap_content"
                android:orientation="horizontal">

                <LinearLayout
                    android:id="@+id/edit_lay"
                    android:background="#ffffff"
                    android:layout_width="match_parent"
                    android:layout_height="wrap_content">

                <EditText
                    android:id="@+id/edit_search"
                    android:layout_width="0dp"
                    android:layout_height="40dp"
                    android:layout_weight="1"
                    android:ems="10"
                    android:hint="search"
                    android:inputType="textPersonName"
                    android:layout_marginLeft="13dp"
                    android:textColor="#333333"
                    android:textColorHint="#cccccc">

                    <requestFocus />
                </EditText>

                <ImageView
                    android:id="@+id/img_search"
                    android:padding="7dp"
                    android:layout_width="40dp"
                    android:layout_height="40dp"
                    android:scaleType="fitXY"
                    android:src="@drawable/icon_search" />

                </LinearLayout>

            </io.codetail.widget.RevealLinearLayout>

            <LinearLayout
                android:id="@+id/items"
                android:layout_width="match_parent"
                android:layout_height="400dp"
                android:background="#ffffff"
                android:orientation="vertical"
                android:paddingLeft="15dp">

                <TextView
                    android:layout_width="wrap_content"
                    android:layout_height="wrap_content"
                    android:layout_marginTop="10dp"
                    android:text="New Text"
                    android:textColor="#333333" />

                <TextView
                    android:layout_width="wrap_content"
                    android:layout_height="wrap_content"
                    android:layout_marginTop="10dp"
                    android:text="New Text"
                    android:textColor="#333333" />

                <TextView
                    android:layout_width="wrap_content"
                    android:layout_height="wrap_content"
                    android:layout_marginTop="10dp"
                    android:text="New Text"
                    android:textColor="#333333" />

                <TextView
                    android:layout_width="wrap_content"
                    android:layout_height="wrap_content"
                    android:layout_marginTop="10dp"
                    android:text="New Text"
                    android:textColor="#333333" />
            </LinearLayout>
        </LinearLayout>

    </io.codetail.widget.RevealFrameLayout>
</LinearLayout>
布局很简单,根据自己需要更改,这里只是一个示例,要注意的一点就是:需要执行动画的视图必须有一个RevealLinearLayout或者RevealFrameLayout的父视图如上的布局。因为动画其实是由这个父视图完成的。
布局效果:

代码解析
首先,点击搜索按钮,弹出片段并放入回退栈片段:显示中:
    @Override
    public boolean onOptionsItemSelected(MenuItem item) {
        int id = item.getItemId();
        if (id == R.id.action_search) {
            getSupportFragmentManager()
                    .beginTransaction()
                    .add(android.R.id.content, new FragmentRevealExample(), "fragment_my")
                    .addToBackStack("fragment:reveal")
                    .commit();
            return true;
        }
        return super.onOptionsItemSelected(item);
    }
重点代码就在FragmentRevealExample中:
在片段的的onCreate()函数中添加一个绘制监听,在绘制渲染之前执行动画:
    edit_lay.getViewTreeObserver().addOnPreDrawListener(
        new ViewTreeObserver.OnPreDrawListener() {
            @Override
            public boolean onPreDraw() {
                //执行动画
                //......
            }
        });
下面是执行动画的主要代码:
 centerX = img_search.getLeft()+img_search.getWidth()/2;
 centerY = img_search.getTop()+img_search.getHeight()/2;

 SupportAnimator mRevealAnimator = ViewAnimationUtils.createCircularReveal(
       edit_lay, centerX, centerY, 20,
       PdUtil.hypo(edit_lay.getWidth(), edit_lay.getHeight()));

 mRevealAnimator.addListener(new SupportAnimator.AnimatorListener() {
     @Override
     public void onAnimationStart() {
         edit_lay.setVisibility(View.VISIBLE);
     }
     @Override
     public void onAnimationEnd() {
         new Handler().postDelayed(new Runnable() {
             @Override
             public void run() {
                 items.setVisibility(View.VISIBLE);
                 edit_search.requestFocus();
                 if (getActivity()!=null) {
                     InputMethodManager imm = (InputMethodManager)getActivity()
                                 .getSystemService(Context.INPUT_METHOD_SERVICE);
                     imm.showSoftInput(edit_search, InputMethodManager.SHOW_IMPLICIT);
                 }
             }
         }, 100);
     }
     @Override
     public void onAnimationCancel() {
     }
     @Override
     public void onAnimationRepeat() {
     }
 });
 mRevealAnimator.setDuration(200);
 mRevealAnimator.setStartDelay(100);
 mRevealAnimator.setInterpolator(new AccelerateDecelerateInterpolator());
 mRevealAnimator.start();
动画其实是模仿一个圆放大的过程,我们首要就有计算出圆心的坐标centerX,centerY,就是放大镜的图标的中心点:
    centerX = img_search.getLeft()+img_search.getWidth()/2;
    centerY = img_search.getTop()+img_search.getHeight()/2;
然后通过库提供的ViewAnimationUtils的createCircularReveal方法获取一个动画对象执行mRevealAnimator,解释下createCircularReveal()方法的参数:
createCircularReveal(View view,int centerX,int centerY,float startRadius, float endRadius)
- 视图:就是需要执行动画的对象,这里简单来说就是搜索框上的的EditText,由于还有一个放大镜的图片,所以我用一个的LinearLayout包围起来了,那我们需要的对象就是这个的LinearLayout,这里要注意,要执行动画的话,那么选定的视图必须有一个RevealLinearLayout或者RevealFrameLayout的父视图,因为你选的景观本身是没有动画效果的动画是由这两个拥有动画效果的父视图来完成的。
- 的centerX:动画中心点X坐标
- centerY:动画中心点ÿ坐标
- startRadius:动画开始时的圆半径
- endRadius:动画结束时的圆半径
的centerX和centerY已经计算出来了,startRadius我们默认20像素,endRadius则取控件的最大宽度(对角线长度):
还记得勾股定理吗?
    public static float hypo(int a, int b){
        return (float) Math.sqrt(Math.pow(a, 2) + Math.pow(b, 2));
    }
动画配置完了,接下来就是动画监听器:
由于动画开始时会有闪动,所以在开始前隐藏需要动画的视图,然后在开始时显示它,这样就不会有闪动了:
     @Override
     public void onAnimationStart() {
         edit_lay.setVisibility(View.VISIBLE);
     }
在动画结束后延迟100毫秒,然后显示整个片段,并弹出键盘:
     @Override
     public void onAnimationEnd() {
         new Handler().postDelayed(new Runnable() {
             @Override
             public void run() {
                 items.setVisibility(View.VISIBLE);
                 edit_search.requestFocus();
                 if (getActivity()!=null) {
                     InputMethodManager imm = (InputMethodManager)getActivity()
                                 .getSystemService(Context.INPUT_METHOD_SERVICE);
                     imm.showSoftInput(edit_search, InputMethodManager.SHOW_IMPLICIT);
                 }
             }
         }, 100);
     }
最后设置动画时长和延迟,就可以执行动画了:
 mRevealAnimator.setDuration(200);
 mRevealAnimator.setStartDelay(100);
 mRevealAnimator.setInterpolator(new AccelerateDecelerateInterpolator());
 mRevealAnimator.start();
到这里,展开动画就完成了,接着是,回缩动画:
注意片段并不能获取回退健点击事件,所以处理过程要放在活动中,片段添加一个公共的onBackPressed,在活动回退事件中获取并调用片段片段的自定义回退事件onBackPressed:
活动:
    @Override
    public void onBackPressed() {
        FragmentRevealExample fragment = (FragmentRevealExample) getSupportFragmentManager().
                findFragmentByTag("fragment_my");
        if(fragment!=null) {
            fragment.onBackPressed();
        }else {
            super.onBackPressed();
        }
    }
片段:
在片段的onBackPressed中执行回缩动画:
    public boolean onBackPressed() {
        SupportAnimator mRevealAnimator = ViewAnimationUtils.createCircularReveal(content,
                centerX, centerY, 20, PdUtil.hypo(content.getWidth(), content.getHeight()));
        mRevealAnimator = mRevealAnimator.reverse();
        if (mRevealAnimator==null) return false;
        mRevealAnimator.addListener(new SupportAnimator.AnimatorListener() {
            @Override
            public void onAnimationStart() {
                content.setVisibility(View.VISIBLE);
            }
            @Override
            public void onAnimationEnd() {
                content.setVisibility(View.INVISIBLE);
                if (getActivity()!=null)
                    getActivity().getSupportFragmentManager().popBackStack();
            }
            @Override
            public void onAnimationCancel() {
            }
            @Override
            public void onAnimationRepeat() {
            }
        });
        mRevealAnimator.setDuration(200);
        mRevealAnimator.setStartDelay(100);
        mRevealAnimator.setInterpolator(new AccelerateDecelerateInterpolator());
        mRevealAnimator.start();
        return true;
    }
回缩动画和开始动画类似,主要是调用了mRevealAnimator.reverse(),使动画方向反转,由放大变为回缩。注意在动画结束后把片段实例从回退栈中移除(出栈) :
getActivity().getSupportFragmentManager().popBackStack();
这样示例的部分就完成了。
如果需要弹出的键盘挤压布局视图的话需要在AndroidManifest.xml中给该活动加上一个属性:
android:windowSoftInputMode="adjustResize"
如果不加的话,弹出的键盘是覆盖在视图之上的。是否需要这个效果看个人爱好了。
Android使用circularReveal仿哔哩哔哩(bilibili)搜索框动画 转载https://www.codesocang.com/appboke/36632.html技术博客阅读排行
-

2016-09-10
-

使用C ++ 11线程支持库创建带有事件循环,消息队列和计时器的辅助线程
2020-09-14
-

快速集成MQTT协议到Android客户端,只需要简单的几个步骤,无需关
2016-09-22
-

2021-01-24
-

2020-12-20
-

2018-04-01
-
2020-08-02
-

2017-01-05
最新文章
-
React Native 启动速度优化――JS 篇【全网最全,值得收藏】
2021-04-19
-
2021-01-24
-
2020-12-20
-

2020-12-19
-
2020-09-14
-
使用C ++ 11线程支持库创建带有事件循环,消息队列和计时器的辅助线程
2020-09-14
-

2020-08-29
-
2020-08-09
热门源码
