摘要:Google发布DataBinding已经有一年时间了,网上也有很多教程。但是在笔者看过的大部分关于MVVM在Android上的实现的教程中,都存在一个十分之严重的问题,就是大部分的介绍MVVM的文章只不过是介绍DataBinding的文章。而在这些教程中,几乎都无一例外地把DataBinding生成的Binding类(或实体类当成是ViewModel层。这两种方法都有一个十分之大的漏洞,就是作为ViewModel层,几乎没有任何控制力。在这里,笔者介绍一个笔者总结出来的如何结合DataBinding在Android实现MVVM模式。
什么是MVVM模式?
MVVM模式是指Model-View-ViewModel。相信看过笔者关于MVP的文章的读者也会发现,无论如何抽象化,在我们的View层中是无法避免的要处理一部分逻辑的。而MVVM模式中的View是将View的状态和行为完全抽象化,把逻辑与界面的控制完全交给ViewModel处理。
MVVM由下面三个核心组件组成:
- Model: 用于获取业务数据模型
- View: 定义了界面中的布局和外观
- ViewModel: 逻辑控制层,负责处理数据和处理View层中的业务逻辑
下面是笔者采用的MVVM模型:
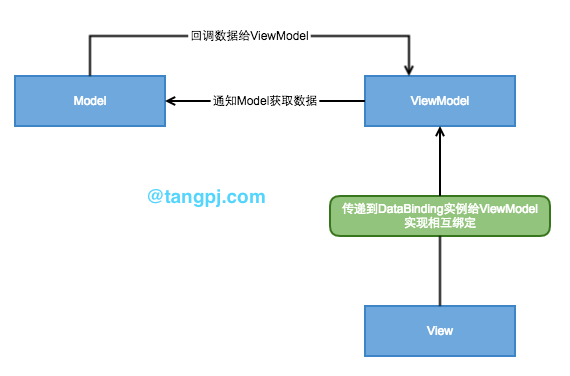
可以看出,这个MVVM的模型图和网上介绍MVVM是有所不同的,下面会根据这个模型图来介绍MVVM在Android。
DataBinding简介
如果了解DataBinding的读者可以直接跳过本小节
什么是DataBinding
DataBinding是Google官方推出的数据绑定器,这个绑定器的作用是把数据和View绑定起来,然后数据改变的时候View会自动刷新,这个DataBinding就是我们实现MVVM模式的关键。
引入DataBinding
引入DataBinding的方式很简单,我们只需要在Module的build.gradle添加如下代码即可。
|
1
2
3
4
5
6
|
android{
....
dataBinding{
enabled true
}
}
|
使用DataBinding
注: 在这里笔者只是介绍DataBinding的其中一个使用方法,更加详细的教程读者可以上网搜索,因为这篇的重点不是DataBinding。
使用DataBinding的布局文件和普通的布局文件有点不同,DataBinding布局文件的根标签是layout标签,layout里面有一个data元素和View元素,这个View元素就是我们没使用DataBinding时候的布局文件。下面看看例子代码:
|
1
2
3
4
5
6
7
8
9
10
11
12
13
14
15
16
17
18
19
20
21
22
23
24
25
26
|
<layout xmlns:android="http://schemas.android.com/apk/res/android">
<data>
<variable
name="user"
type="com.example.mvvmdemo.UserBean"/>
</data>
<LinearLayout
android:orientation="vertical" android:layout_width="match_parent"
android:layout_height="match_parent">
<TextView
android:layout_width="match_parent"
android:layout_height="wrap_content"
android:text="@{user.name}"/>
<TextView
android:layout_width="match_parent"
android:layout_height="wrap_content"
android:text="@{user.sex}"/>
</LinearLayout>
</layout>
|
data元素里面的user就是我们自定义的user实体类,当我们向DataBinding中设置好user类以后,我们的两个Text会自动设置text的值。
UserBean实体类代码:
|
1
2
3
4
5
6
7
8
9
10
11
12
13
|
public class {
public ObservableField<String> name = new ObservableField<>();
public ObservableField<String> sex = new ObservableField<>();
public ObservableField<Integer> age = new ObservableField<>() ;
public (){
name.set("张三");
sex.set("男");
age.set(19);
}
}
|
这个实体类有点特别,里面的元素是DataBinding中的ObservableField类,ObservableField的作用是,当我们实体类中的值发生改变时会自动通知View刷新。所以使用DataBinding的时候,我建议使用ObservableField来定义我们的实体类。
之后,我们只需要在Activity中绑定layout就可以了。下面是使用代码:
|
1
2
3
|
ActivityTesBinding activityTesBinding = DataBindingUtil.setContentView(this,R.layout.activity_tes);
UserBean user = new UserBean();
activityTesBinding.setUser(user);
|
在使用DataBinding的时候,我们设置布局使用DataBindingUtil工具类中的setContentView()方法,这普通的设置方法有点不一样,大家需要注意。按照我们的理论,我们设置好了user后,我们layout中的TextView显示为“张三”和“男”。在这里我就不作演示了,大家去尝试下,很简单的。
好了,这就是关于DataBinding的简单介绍了,读者如果想知道更加详细的使用方法需要自行搜索。DataBinding还有更多更有趣的功能的,希望大家看完这篇文章后去实践下。
大部分MVVM教程的局限性
在笔者看过的大部分关于MVVM在Android上的实现的教程中,都存在一个十分之严重的问题,就是大部分的介绍MVVM的文章只不过是介绍DataBinding的文章。而在这些教程中,几乎都无一例外地把DataBinding生成的Binding类(上一小节中 ActivityTesBinding)或实体类(UserBean)当成是ViewModel层。
这两种方法都有一个十分之大的漏洞,就是作为ViewModel层,几乎没有任何控制力。如果要添加其他的拓展功能的话,几乎都需要在Activity、Fragment等View层中实现。这样的做法不但无法实现代码解耦,而且如果一个页面处理的功能过多的话,代码的可读性会非常差。
那么我们如何在Android上正确使用MVVM模式呢?请看下一章
如何在Android上正确使用MVVM模式
在MVVM模式中,DataBinding应该是作为一个绑定器用于绑定实体类与View层,而我们的业务逻辑和View的控制应该抽象我们的ViewModel层中。其实方法很简单,我们只需要简单地把我们的Binding类传递到我们的ViewModel层中就可以实现通过ViewModel层对View层的控制了。下面我们来看看优化后的layout代码。
activity_main.xml :
|
1
2
3
4
5
6
7
8
9
10
11
12
13
14
15
16
17
18
19
20
21
22
23
24
25
26
27
28
29
30
31
32
33
34
35
36
37
38
39
|
<layout xmlns:android="http://schemas.android.com/apk/res/android"
xmlns:app="http://schemas.android.com/apk/res-auto"
xmlns:tools="http://schemas.android.com/tools">
<android.support.design.widget.CoordinatorLayout
android:layout_width="match_parent"
android:layout_height="match_parent"
android:fitsSystemWindows="true"
tools:context="com.example.mvvmdemo.MainActivity">
<android.support.design.widget.AppBarLayout
android:layout_width="match_parent"
android:layout_height="wrap_content"
android:theme="@style/AppTheme.AppBarOverlay">
<android.support.v7.widget.Toolbar
android:id="@+id/toolbar"
android:layout_width="match_parent"
android:layout_height="?attr/actionBarSize"
android:background="?attr/colorPrimary"
app:popupTheme="@style/AppTheme.PopupOverlay" />
</android.support.design.widget.AppBarLayout>
<include layout="@layout/content_main"
android:id="@+id/content_main"
/>
<android.support.design.widget.FloatingActionButton
android:id="@+id/fab"
android:layout_width="wrap_content"
android:layout_height="wrap_content"
android:layout_gravity="bottom|end"
android:layout_margin="@dimen/fab_margin"
app:srcCompat="@android:drawable/ic_dialog_email" />
</android.support.design.widget.CoordinatorLayout>
</layout>
|
content_main:
|
1
2
3
4
5
6
7
8
9
10
11
12
13
14
15
16
17
18
19
20
21
22
23
24
25
26
27
28
29
30
31
32
33
34
35
36
37
38
39
40
41
42
43
44
45
46
47
48
49
50
51
52
53
54
55
56
57
58
59
60
61
62
63
64
65
66
67
68
69
70
71
72
73
74
75
|
<layout xmlns:android="http://schemas.android.com/apk/res/android"
xmlns:app="http://schemas.android.com/apk/res-auto"
xmlns:tools="http://schemas.android.com/tools">
<data>
<variable
name="viewModel"
type="com.example.mvvmdemo.MainViewModel"/>
</data>
<LinearLayout
android:layout_width="match_parent"
android:layout_height="match_parent"
android:padding="@dimen/activity_vertical_margin"
android:orientation="vertical"
app:layout_behavior="@string/appbar_scrolling_view_behavior"
tools:context="com.example.mvvmdemo.MainActivity"
tools:showIn="@layout/activity_main">
<android.support.design.widget.TextInputLayout
android:layout_width="match_parent"
android:layout_height="wrap_content">
<EditText
android:id="@+id/name"
android:layout_width="match_parent"
android:layout_height="wrap_content"
android:hint="姓名"
android:layout_margin="@dimen/activity_vertical_margin" />
</android.support.design.widget.TextInputLayout>
<android.support.design.widget.TextInputLayout
android:layout_width="match_parent"
android:layout_height="wrap_content">
<EditText
android:id="@+id/sex"
android:layout_width="match_parent"
android:layout_height="wrap_content"
android:hint="性别"
android:layout_margin="@dimen/activity_vertical_margin" />
</android.support.design.widget.TextInputLayout>
<android.support.design.widget.TextInputLayout
android:layout_width="match_parent"
android:layout_height="wrap_content">
<EditText
android:id="@+id/age"
android:layout_width="match_parent"
android:layout_height="wrap_content"
android:hint="年龄"
android:inputType="number"
android:layout_margin="@dimen/activity_vertical_margin" />
</android.support.design.widget.TextInputLayout>
<Button
android:layout_width="match_parent"
android:layout_height="wrap_content"
android:text="提交"
android:onClick="@{viewModel.applyUser}"/>
<TextView
android:layout_width="wrap_content"
android:layout_height="wrap_content"
android:layout_margin="@dimen/activity_vertical_margin"
android:text="@{viewModel.user.name + '\n' + viewModel.user.sex + '\n' + viewModel.user.age}" />
</LinearLayout>
</layout>
|
这里依然是采用MD风格的界面设计,现在我们主要来看content_main中的代码。我们可以看到layout中的代码和上一节中介绍的差不多,但是这里引入了一个叫MainViewModel的类,这个就是笔者提到的ViewModel类。我们可以看到,button中的android:onClick="@{viewModel.applyUser}"这句代码的作用就是把View层中这个 Button的点击逻辑交给 MainViewModel中的 applyUser方法处理,并且我们的User类也是通过ViewModel来引用的。 上面这个只是ViewModel在这里的其中一个应用而已。下面来看看Activity和ViewModel中的代码。
MainActivity:
|
1
2
3
4
5
6
7
8
9
10
11
|
public class extends {
protected void onCreate(Bundle savedInstanceState) {
super.onCreate(savedInstanceState);
// 创建ViewModel
ActivityMainBinding activityMainBinding
= DataBindingUtil.setContentView(this,R.layout.activity_main);
MainViewModel mainViewModel = new MainViewModel(this,activityMainBinding);
}
|
MainActivity的代码很简单,它的核心就是创建MainViewModel这一句,其他的逻辑都交给了ViewModel处理。当我们的遇到无法在ViewModel内部处理的业务时(例如菜单监控等),我们可以通过在View层中调用ViewModel的方法来实现。
MainViewModel:
|
1
2
3
4
5
6
7
8
9
10
11
12
13
14
15
16
17
18
19
20
21
22
23
24
25
26
27
28
29
30
31
32
33
34
35
36
37
|
public class {
private ActivityMainBinding activityMainBinding;
private ContentMainBinding contentMainBinding;
private AppCompatActivity activity;
private UserBean user;
public (AppCompatActivity activity, ActivityMainBinding activityMainBinding){
this.activity = activity;
this.activityMainBinding = activityMainBinding;
this.contentMainBinding = activityMainBinding.contentMain;
init();
}
public void (){
activity.setSupportActionBar(activityMainBinding.toolbar);
activityMainBinding.fab.setOnClickListener(new View.OnClickListener() {
@Override
public void (View view) {
Snackbar.make(view, "Replace with your own action", Snackbar.LENGTH_LONG)
.setAction("Action", null).show();
}
});
user = new UserBean();
contentMainBinding.setViewModel(this);
}
public void (View v){
Snackbar.make(v,"提交成功",Snackbar.LENGTH_SHORT).setAction("Action",null).show();
user.name.set(contentMainBinding.name.getText().toString());
user.sex.set(contentMainBinding.sex.getText().toString());
user.age.set(Integer.valueOf(contentMainBinding.age.getText().toString()));
}
}
|
上面的代码中要特别注意的一句代码就是:
|
1
|
contentMainBinding.setViewModel(this);
|
这句代码就实现了我们的ViewModel层与View层layout文件的绑定,这样就使得View层中的layout能调用ViewModel中的一些方法,在本例子中就是button控件调用public void applyUser(View v)方法。
代码很简单,这种方案的核心思想就是:
- View层中通过DataBinding生成Binding实例
- View层把生成的Binding实例传递给ViewModel层
- ViewModel层通过把自身与Binding实例绑定,从而实现View中layout与ViewModel的绑定。
通过这种方法还有一个好处就是,我们的layout文件中data标签中只需要引入ViewModel就可以了,其它的数据对象统一在ViewModel中处理。
我们来看看Demo效果图 初始化: 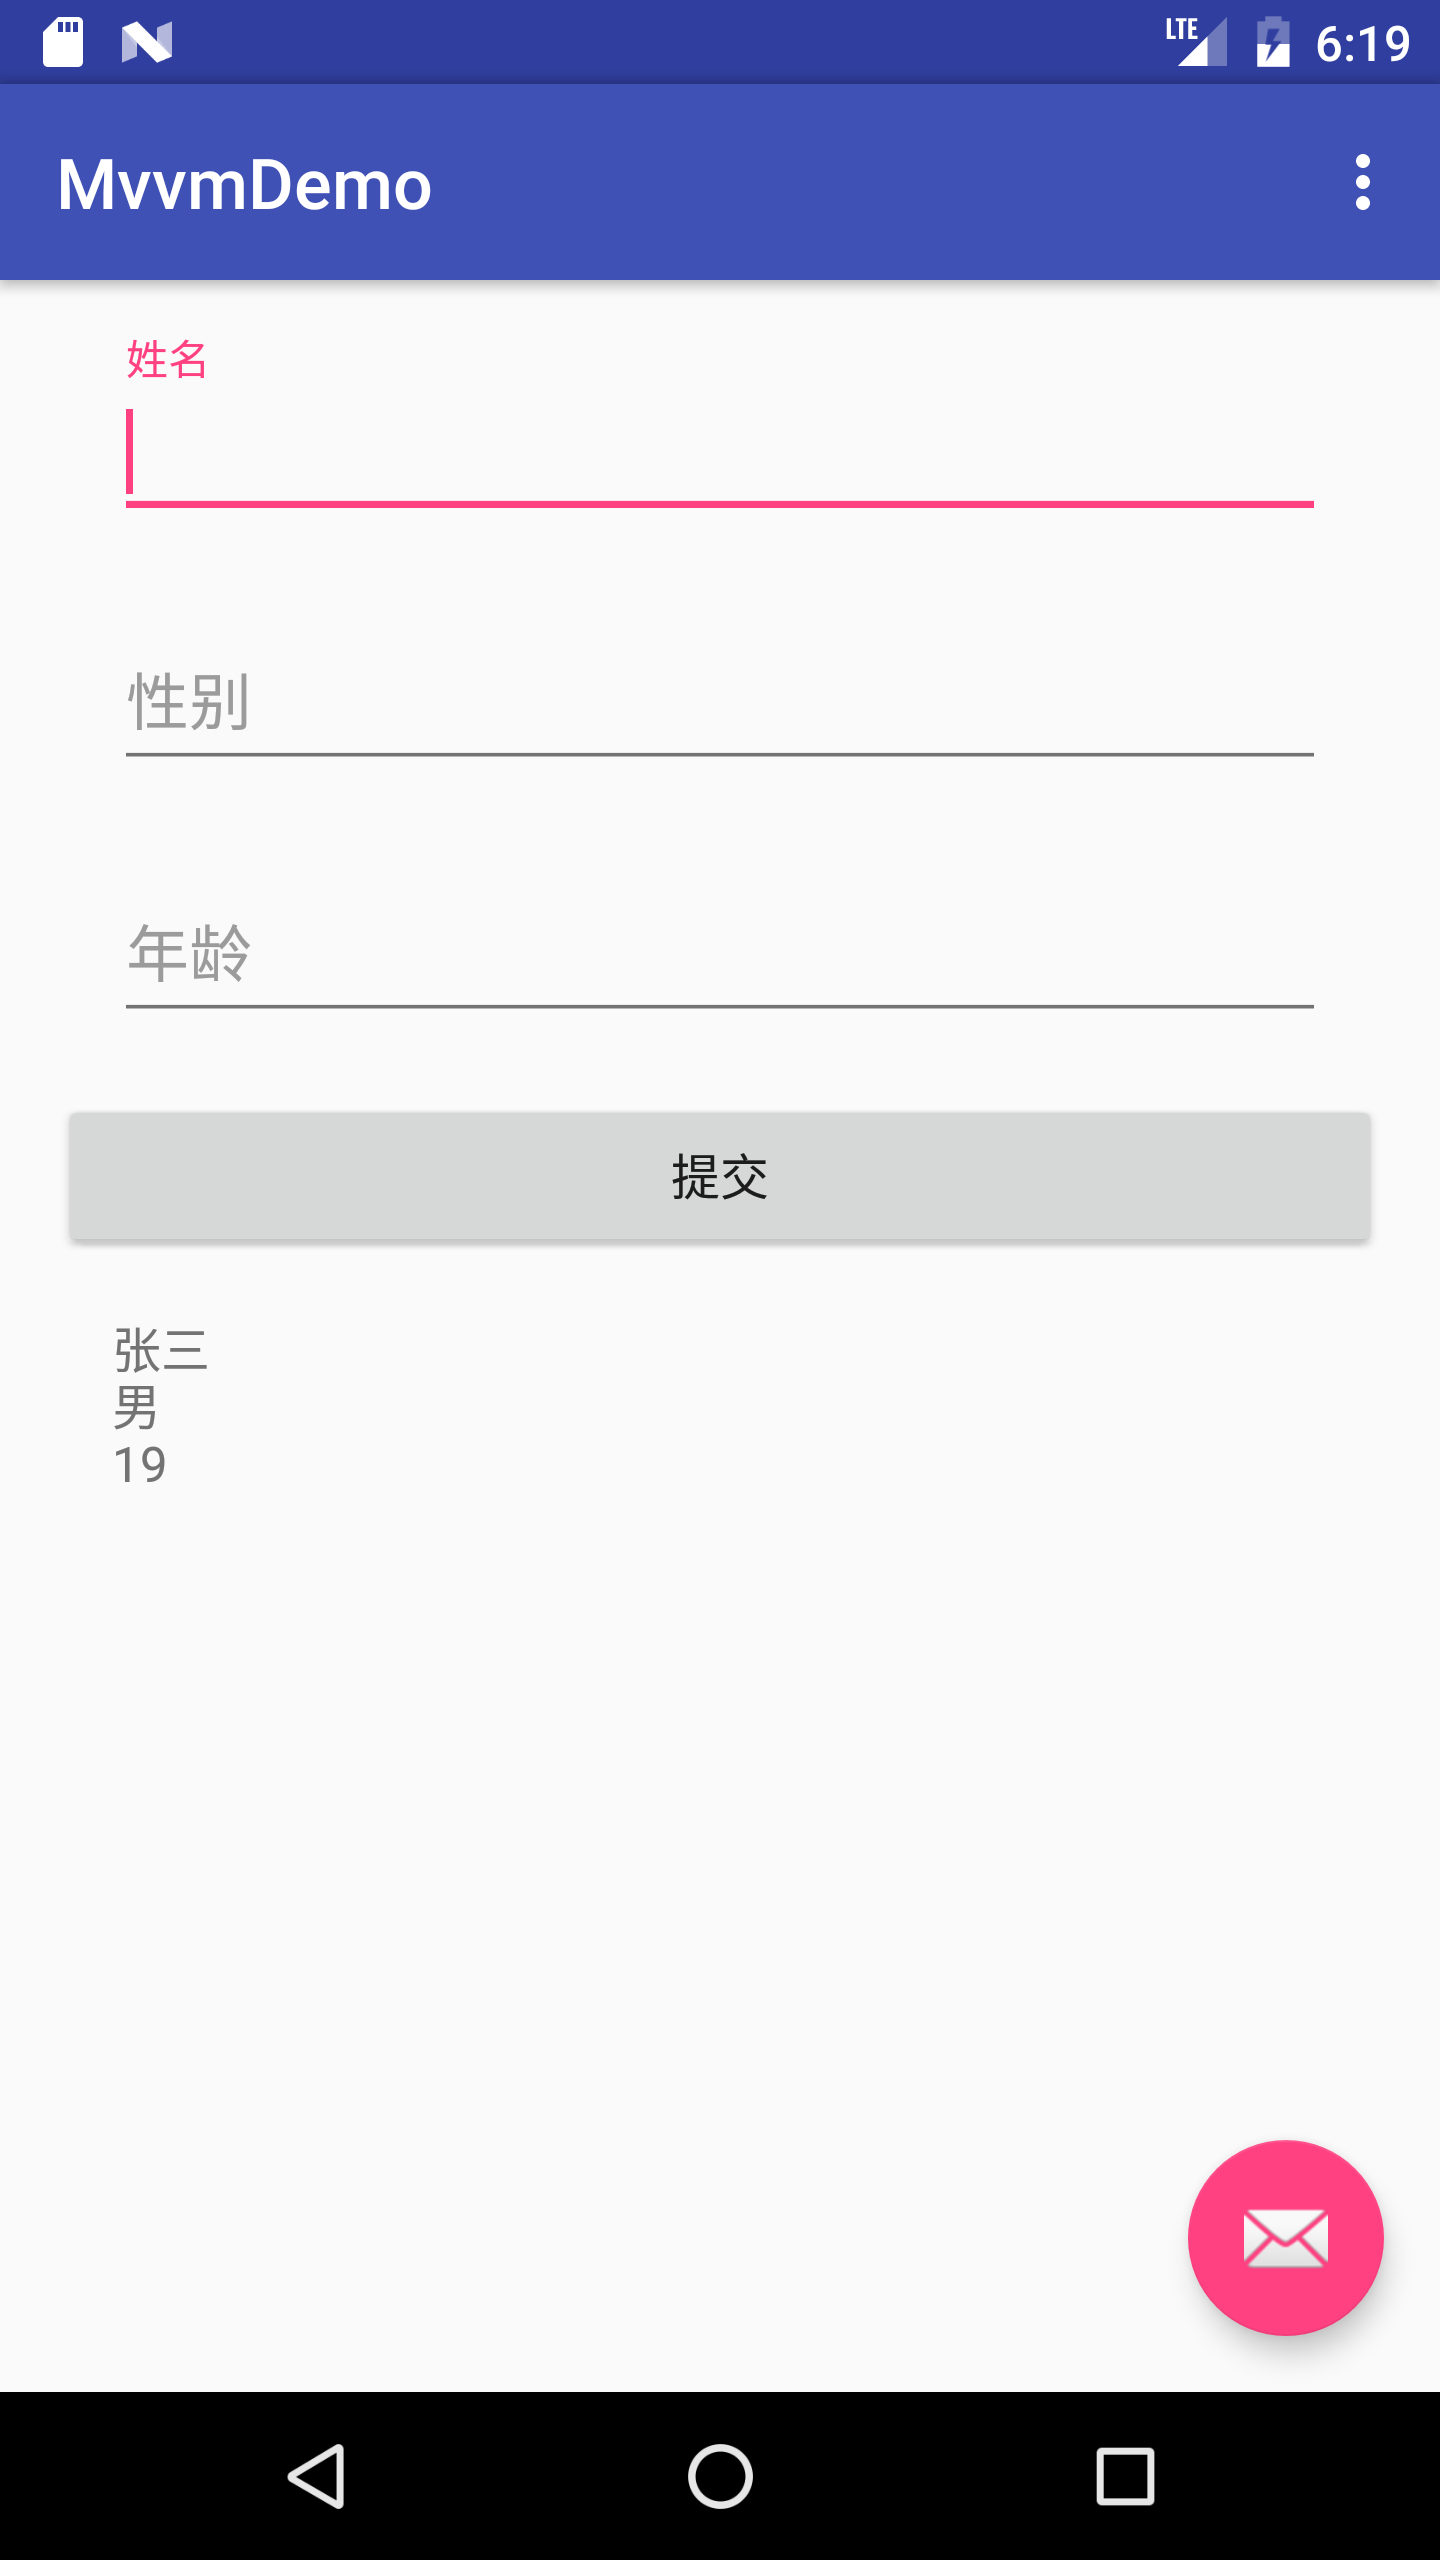
对User重新复赋值: 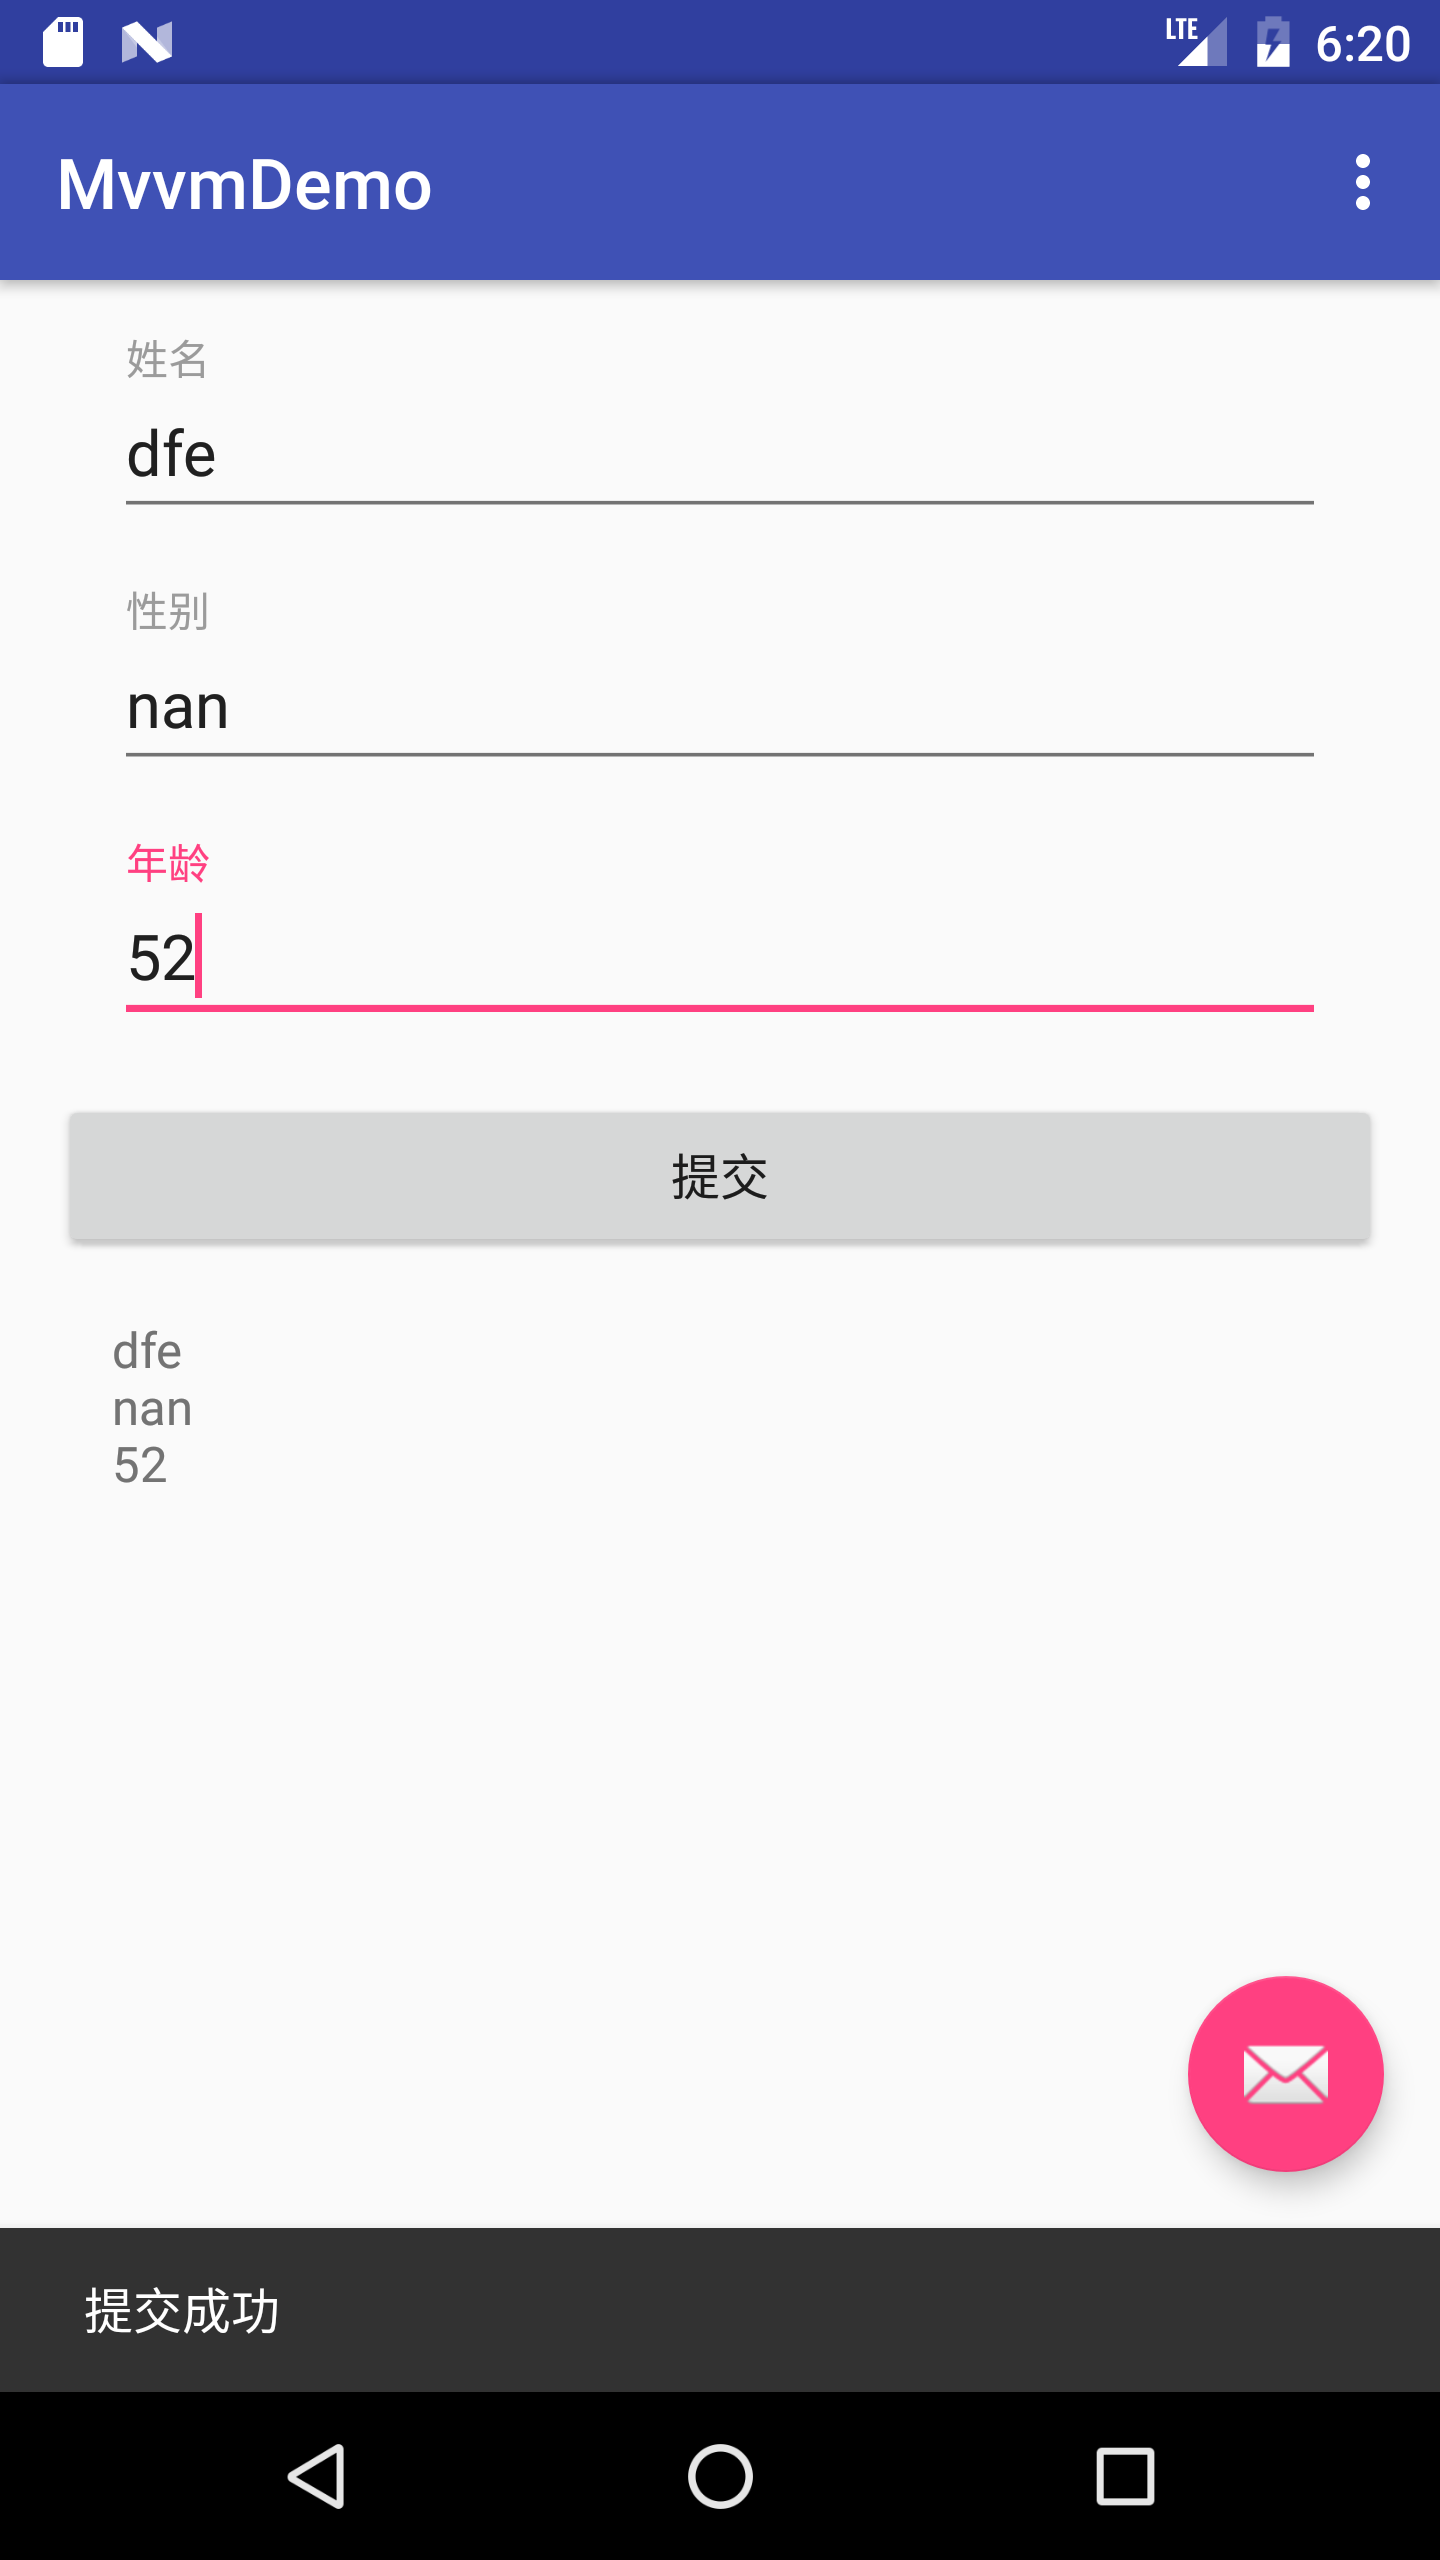
网上对于MVVM的一些错误解读
除了上述提到的使用Binding充当ViewModel层的错误解读外,还有一种大家注意的模式就是所谓的MVPVM模式。这种模式的核心思想就是在MVVM的基础上加上Presenter层。笔者实在是有点搞不懂为什么要这样分层,首先Presenter和ViewModel层都是逻辑控制层,同一个功能没必要分出两层。其次就是笔者认为在APP中分出三层已经能很好地完成任务了,如果分成四层的话不好管理的同时还会增加代码的复杂度,因为你无法很好区分Presenter和ViewModel的具体功能。所以笔者在这里建议,绝对不要使用所谓的MVPVM模式来进行开发。MVVM已经能很好地满足我们的开发需求了。
小结
对MVVM在Android上的应用到这里就结束了,看过笔者关于MVP模式框架设计的读者应该会知道,这只是个开端。所以笔者在后面会专门写一个系列关于介绍如何设计一个MVVM框架的文章的。在写这个系列文章之前,首先会有一系列的基础技术的介绍和一些技术解决方案,有兴趣的读者请留意哦。
MVVM在Android上的正确使用方式 转载https://www.codesocang.com/appboke/35211.html技术博客阅读排行
-

2016-09-10
-

使用C ++ 11线程支持库创建带有事件循环,消息队列和计时器的辅助线程
2020-09-14
-

快速集成MQTT协议到Android客户端,只需要简单的几个步骤,无需关
2016-09-22
-

2021-01-24
-

2020-12-20
-

2018-04-01
-
2020-08-02
-

2017-01-05
最新文章
-
React Native 启动速度优化――JS 篇【全网最全,值得收藏】
2021-04-19
-
2021-01-24
-
2020-12-20
-

2020-12-19
-
2020-09-14
-
使用C ++ 11线程支持库创建带有事件循环,消息队列和计时器的辅助线程
2020-09-14
-

2020-08-29
-
2020-08-09
热门源码
