如何使用Vue+Element做个个人中心
前言
最近想要换个脑子玩玩,写个页面玩玩~
先看看效果:

后面加个路由超链接,嘿嘿~
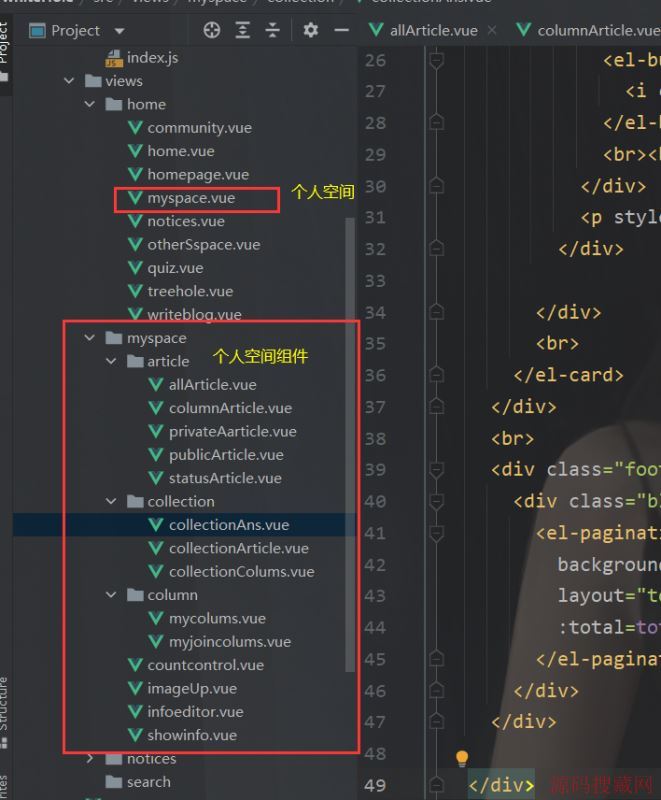
个人空间
我们先来聊聊主要的这个玩意,也就是咱们的入口。
对应的路由是:
这里面的组件可不少,里面还有很多分组件,没写,有空我就写写。
  {
      path: '/myspace',
      name: 'myspace',
      component: myspace,
      children:[
        {
          path: 'showinfo',
          name: 'showinfo',
          component: showinfo
        },
        {
          path: 'infoeditor',
          name: 'infoeditor',
          component: infoeditor,
        },
        {
          path: 'countcontrol',
          name: 'countcontrol',
          component: countcontrol,
        },
        {
          path: 'imageUp',
          name: 'imageUp',
          component: imageUp
        },
        {
          path: 'privateAarticle',
          name: 'privateAarticle',
          component: privateAarticle,
        },
        {
          path: 'publicArticle',
          name: 'publicArticle',
          component: publicArticle,
        },
        {
          path: '',
          name: 'allArticle',
          component: allArticle,
        },
        {
          path: 'columnArticle',
          name: 'columnArticle',
          component: columnArticle
        },
        {
          path: 'statusArticle',
          name: 'statusArticle',
          component: statusArticle
        },
        {
          path: 'mycolums',
          name: 'mycolums',
          component: mycolums
        },
        {
          path: 'myjoincolums',
          name: myjoincolums,
          component: myjoincolums
        },
        {
          path: 'collectionAns',
          name: collectionAns,
          component: collectionAns
        },
        {
          path: 'collectionArticle',
          name: collectionArticle,
          component: collectionArticle
        },
        {
          path: 'collectionColums',
          name: collectionColums,
          component: collectionColums
        }
      ]
    },
个人空间导航代码如下:
<template>
  <div>
    <el-container style="height: 600px; border: 1px solid #eee">
      <el-aside width="200px" style="background-color: white">
        <el-menu :default-openeds="['1']">

          <el-submenu index="1">
            <template slot="title">
              <i class="el-icon-postcard"></i>信息修改</template>
            <el-menu-item-group>

              <router-link class="alink" to="/myspace/showinfo">
                <el-menu-item index="1-1">
                  基本信息
                </el-menu-item>

              </router-link>

              <router-link class="alink" to="/myspace/infoeditor">
                <el-menu-item index="1-2">
                  信息修改
                </el-menu-item>
              </router-link>

              <router-link class="alink" to="/myspace/imageUp">
                <el-menu-item index="1-3">

                  头像修改

                </el-menu-item>
              </router-link>

              <router-link class="alink" to="/myspace/countcontrol">
                <el-menu-item index="1-4">

                    账号管理

                </el-menu-item>
              </router-link>


            </el-menu-item-group>

          </el-submenu>


          <el-submenu index="2">
            <template slot="title">
              <i class="el-icon-postcard"></i>文章管理</template>
            <el-menu-item-group>
              <router-link class="alink" to="/myspace/privateAarticle">
                <el-menu-item index="2-1">
                  私密文章
                </el-menu-item>
              </router-link>

              <router-link class="alink" to="/myspace/publicArticle">
                <el-menu-item index="2-2">
                  PUBLIC
                </el-menu-item>
              </router-link>

              <router-link class="alink" to="/myspace">
                <el-menu-item index="2-3">
                  全部文章
                </el-menu-item>
              </router-link>

              <router-link class="alink" to="/myspace/columnArticle">
                <el-menu-item index="2-4">
                  我的专栏
                </el-menu-item>
              </router-link>

              <router-link class="alink" to="/myspace/statusArticle">
                <el-menu-item index="2-5">
                  审核状态
                </el-menu-item>
              </router-link>
            </el-menu-item-group>

          </el-submenu>


          <el-submenu index="3">
            <template slot="title">
              <i class="el-icon-edit"></i>文章书写
            </template>
            <el-menu-item-group>
              <router-link class="alink" to="/writeblog">
                <el-menu-item index="3-1">
                  文章书写
                </el-menu-item>
              </router-link>
            </el-menu-item-group>

          </el-submenu>

          <el-submenu index="4">
            <template slot="title">
              <i class="el-icon-postcard"></i>社区</template>

            <el-menu-item-group>

              <router-link class="alink" to="/myspace/myjoincolums">
                <el-menu-item index="4-1">
                  我的社区
                </el-menu-item>
              </router-link>

              <router-link class="alink" to="/myspace/mycolums">
                <el-menu-item index="4-2">
                  我创建的社区
                </el-menu-item>
              </router-link>


            </el-menu-item-group>
          </el-submenu>

          <el-submenu index="5">
            <template slot="title">
              <i class="el-icon-star-on"></i>收藏</template>

            <el-menu-item-group>

              <router-link class="alink" to="/myspace/collectionAns">
                <el-menu-item index="5-1">
                  问答收藏
                </el-menu-item>
              </router-link>

              <router-link class="alink" to="/myspace/collectionArticle">
                <el-menu-item index="5-2">
                  文章收藏
                </el-menu-item>
              </router-link>

              <router-link class="alink" to="/myspace/collectionColums">
                <el-menu-item index="5-3">
                  社区收藏
                </el-menu-item>
              </router-link>

            </el-menu-item-group>


          </el-submenu>
        </el-menu>
      </el-aside>


      <el-container
        style="background-image: url(/static/logo/noticesbg.jpg);
        background-repeat: no-repeat;
        background-size:100% 100%;
        "
      >
        <el-main>
          <div style="width: 80%;margin: 0 auto">
            <router-view></router-view>
          </div>
        </el-main>
      </el-container>

    </el-container>

  </div>
</template>

<script>
export default {
  name: "myspace",
  data() {

    return {

    }
  },
}
</script>

<style scoped>
.el-header {
  background-color: #e5efe2;
  color: #333;
  line-height: 60px;
}

.el-aside {
  color: #333;
}
.router-link-active {
  text-decoration: none;
}

.alink{

  text-decoration: none;
}
</style>
信息修改
由于每一个的组件都有一个分类,每一个分类的实现都是类似的,所以我们挑三个说说就行了,文章书写是一个超链接,会通向这儿,这个先去说过,我就不重复了。
基本信息实现
这个是展示,没什么copy组件的事儿
<template>
<div>
    <div  style="width:14%;height: 130px;border-radius: 100px;display:inline-block;">
      <img
        style="width:100%;height: 100%;border-radius: 100px"
        src="/static/temporary/headpic.jpg"
        class="image"
      >
    </div>

  <br>
  <br>
  <el-descriptions :column="1" border>

    <el-descriptions-item label="用户名" v-model="username" ><p class="message">{{username}}</p></el-descriptions-item>
    <el-descriptions-item label="邮箱号" v-model="email" class="message"><p class="message">{{email}}</p></el-descriptions-item>
    <el-descriptions-item label="白洞值" v-model="level" class="message"><p class="message">{{level}}</p></el-descriptions-item>
    <el-descriptions-item label="座右铭" v-model="motto" class="message" ><p class="message">{{motto}}</p></el-descriptions-item>
    <el-descriptions-item label="居住地" v-model="city" class="message"><p class="message">{{city}}</p></el-descriptions-item>

  </el-descriptions>
</div>
</template>

<script>
export default {
  name: "showinfo",
  data(){
    return{
      username: "Huterox",
      email: 18100000000,
      motto: "除非我不想赢,否则没人能让我输",
      city: "九江",
      level: 9999


    }
  }
}
</script>

<style scoped>
.message{
  width: 20em;
  overflow: hidden;
  text-overflow:ellipsis;
  white-space: nowrap;
}
</style>
信息修改实现
这个也没啥就是这个
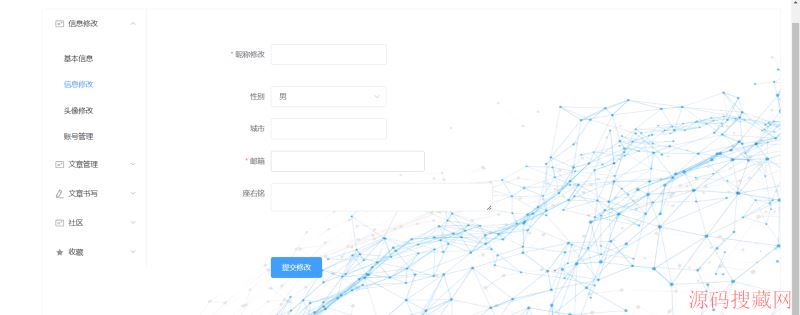
<template>
<div style="width: 70%;margin-top: 5%">
  <el-form :model="ruleForm"
           :rules="rules"
           ref="ruleForm"
           label-width="100px"
           class="demo-dynamic"


  >
    <el-form-item
      style="width: 49%"
      label="昵称修改"
      prop="name"
      :rules="[
          { required: true, message: '请注意昵称长度在3~15个字符', trigger: 'blur' },
          { min: 3, max: 15, message: '长度在 3 到 5 个字符', trigger: 'blur' }
        ]"

    >
      <el-input v-model="ruleForm.name"></el-input>
    </el-form-item>
    <br>
    <el-form-item label="性别" prop="region">
      <el-select v-model="ruleForm.sex" placeholder="请选择性别">
        <el-option label="男" value="shanghai"></el-option>
        <el-option label="女" value="beijing"></el-option>
      </el-select>
    </el-form-item>

    <el-form-item
      style="width: 49%"
      label="城市"
      prop="city"
      :rules="[
          { required: false, message: '请注意长度在3~20个字符', trigger: 'blur' },
          { min: 3, max: 20, message: '长度在 3 到 5 个字符', trigger: 'blur' }
        ]"

    >
      <el-input v-model="ruleForm.city"></el-input>
    </el-form-item>

    <el-form-item
      style="width: 60%"
      prop="email"
      label="邮箱"
      :rules="[
      { required: true, message: '请输入邮箱地址', trigger: 'blur' },
      { type: 'email', message: '请输入正确的邮箱地址', trigger: ['blur', 'change'] }
    ]"
    >
      <el-input v-model="ruleForm.email"></el-input>
    </el-form-item>

    <el-form-item
      style="width: 80%;height: 120px"
      label="座右铭"
      prop="motto"
      :rules="[
          { required: false, message: '请输入座右铭', trigger: 'blur' },
          { min: 0, max: 150, message: '请注意长度不能超过150个字符', trigger: 'blur' }
        ]"

    >
      <el-input type="textarea" style="height: 100px;resize: none" v-model="ruleForm.motto"></el-input>
    </el-form-item>

    <el-form-item>
      <el-button type="primary" @click="submitForm('ruleForm')">提交修改</el-button>

    </el-form-item>
  </el-form>
</div>
</template>

<script>
export default {
  name: "infoeditor",
  data() {
    return {
      ruleForm: {
        name: '',
        sex: '男',
        email: '',
        city: '',
        motto: '',

      },
    };
  },
  methods: {
    submitForm(formName) {
      this.$refs[formName].validate((valid) => {
        if (valid) {
          alert('submit!');
        } else {
          console.log('error submit!!');
          return false;
        }
      });
    },

  }

}
</script>

<style scoped>
</style>
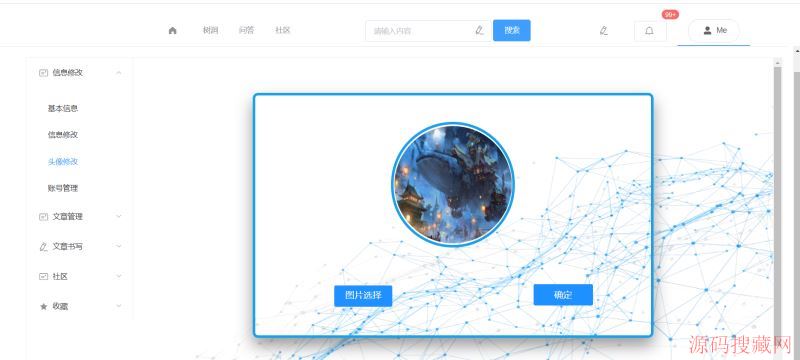
头像修改实现
然后是我的祖传代码,不过这次优化了一下
<template>
  <div>
    <div class="show">
      <div class="show1" >
        <img ref="showing" src="" id="showimg" style="margin-left: 1px;margin-top: 3px">
      </div>
      <div class="upload">图片选择
      <input multiple="multiple" id="file" ref="file"
             accept=".jpg,.png"
             @click="changepic(this)" type="file" name="userpic"
             style="
              position: absolute;
              overflow: hidden;
              right: 0;
              top: 0;
              opacity: 0;
             width: 100%;
             height: 32px;
             "
      >
      </div>
      <button @click="subchangepic()" style="height: 40px;position: relative; margin-left:35%;">确定</button>
    </div>
  </div>
</template>

<script>
export default {
  name: "imageUp",
  data(){
    return {
      filename: null,
      f64: null,
      loadImage: ""
    }
  },
  methods: {
    changepic() {
      document.getElementById('file').onchange = function () {
        var imgFile = this.files[0];
        var fr = new FileReader();

        fr.onload = function () {
          let showing = document.getElementById('showimg')
          let img = fr.result;
          this.f64 = img;
          this.filename = imgFile.name
          showing.src = img;
          showing.style.height = "220px";
          showing.style.width = "220px";
          showing.style.borderRadius = "200px"
        };
        fr.readAsDataURL(imgFile);
      }
    },
  }
}
</script>

<style scoped>

.upload{
  margin-left: 20%;
  width: 12%;
  text-align: center;
  color: white;
  height: 32px;
  border-radius: 3px;
  background: #1E90FF;
  cursor: pointer;
  outline: none;
  border-width: 0px;
  font-size: 17px;
  display:inline-block;
  padding: 4px 10px;
  line-height:30px;
  position: relative;
  text-decoration: none;
}

button {
  margin-left: 70%;
  width: 15%;
  height: 35px;
  border-width: 0px;
  border-radius: 3px;
  background: #1E90FF;
  cursor: pointer;
  outline: none;
  color: white;
  font-size: 17px;
}
.show{
  margin: 100px auto;
  width: 80%;
  height: 450px;
  border: 5px solid #18a0ec;
  transition: all 0.9s;
  border-radius: 10px;
}
.show1{
  margin: 50px auto;
  width: 222px;
  height: 226px;
  border: 5px solid #18a0ec;
  transition: all 0.9s;
  border-radius: 150px;
}

.show1:hover{
  box-shadow: 0px 15px 30px rgba(0, 0, 0, 0.4);
  margin-top: 45px;
}

.show:hover{
  box-shadow: 0px 15px 30px rgba(0, 0, 0, 0.4);
  margin-top: 45px;
}

.texti{
  border: 1px solid #ccc;
  padding: 13px 14px;
  width: 30%;

  font-size: 14px;
  font-weight: 300;

  border-radius: 5px; /* 边框半径 */
  background: white; /* 背景颜色 */
  cursor: pointer; /* 鼠标移入按钮范围时出现手势 */
  outline: none; /* 不显示轮廓线 */
}
.texti:focus{
  border-color: #1e88e1;
  outline: 0;
  -webkit-box-shadow: inset 0 1px 1px rgba(0,0,0,.075),0 0 8px rgba(102,175,233,.6);
  box-shadow: inset 0 1px 1px rgba(0,0,0,.075),0 0 8px rgba(102,175,233,.6)
}
textarea {
  resize: none;

}
</style>
账号管理实现
这个其实就是修改账号,后面我想单独做大一点,所以要单独分开,例如信息验证,学历验证,专家验证啥的。
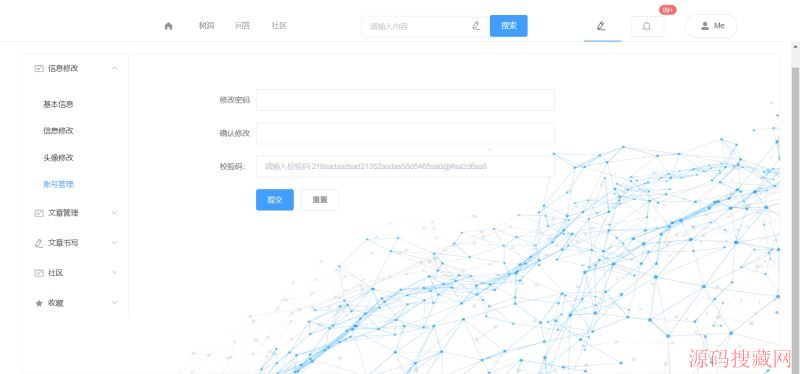
<template>
<div style="width: 70%;margin-top: 5%">
  <el-form :model="ruleForm" status-icon :rules="rules" ref="ruleForm" label-width="100px" class="demo-ruleForm">
    <el-form-item label="修改密码" prop="pass">
      <el-input type="password" v-model="ruleForm.pass" autocomplete="off"></el-input>
    </el-form-item>
    <el-form-item label="确认修改" prop="checkPass">
      <el-input type="password" v-model="ruleForm.checkPass" autocomplete="off"></el-input>
    </el-form-item>
    <el-form-item label="校验码:" prop="verify">

      <el-input placeholder="请输入校验码:216sadasdsad21352asdas55d5465sad@#sa2d6sa5" v-model.number="ruleForm.verify"></el-input>
    </el-form-item>
    <el-form-item>
      <el-button type="primary" @click="submitForm('ruleForm')">提交</el-button>
      <el-button @click="resetForm('ruleForm')">重置</el-button>
    </el-form-item>
  </el-form>
</div>
</template>

<script>
export default {
  name: "countcontrol",
  data() {
    var checkAge = (rule, value, callback) => {
      if (!value) {
        return callback(new Error('校验码不能为空'));
      }
      setTimeout(() => {
        if ((value)!=="216sadasdsad21352asdas55d5465sad@#sa2d6sa5") {
          callback(new Error('校验码错误'));
        } else {

            callback();

        }
      }, 1000);
    };
    var validatePass = (rule, value, callback) => {
      if (value === '') {
        callback(new Error('请输入密码'));
      } else {
        if(value.length<=6){
          callback(new Error("密码长度不能低于6"))
        }
        if (this.ruleForm.checkPass !== '' ) {
          this.$refs.ruleForm.validateField('checkPass');
        }
        callback();
      }
    };
    var validatePass2 = (rule, value, callback) => {
      if (value === '') {
        callback(new Error('请再次输入密码'));
      } else if (value !== this.ruleForm.pass) {
        callback(new Error('两次输入密码不一致!'));
      } else {
        callback();
      }
    };
    return {
      ruleForm: {
        pass: '',
        checkPass: '',
        verify: ''
      },
      rules: {
        pass: [
          { validator: validatePass, trigger: 'blur' }
        ],
        checkPass: [
          { validator: validatePass2, trigger: 'blur' }
        ],
        verify: [
          { validator: checkAge, trigger: 'blur' }
        ]
      }
    };
  },
  methods: {
    submitForm(formName) {
      this.$refs[formName].validate((valid) => {
        if (valid) {
          alert('submit!');
        } else {
          console.log('error submit!!');
          return false;
        }
      });
    },
    resetForm(formName) {
      this.$refs[formName].resetFields();
    }
  }
}
</script>

<style scoped>
</style>
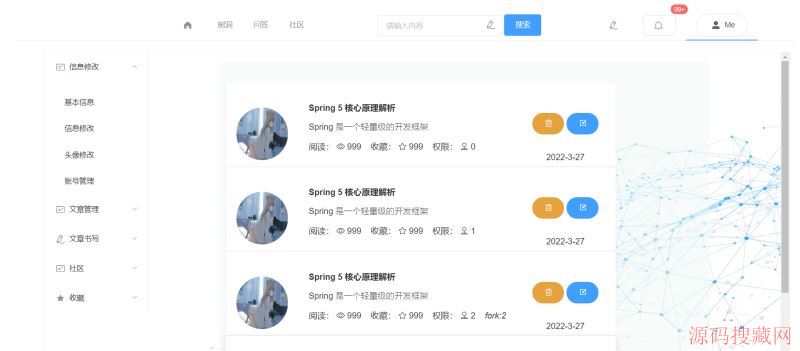
文章列表实现
这个部分是这样的
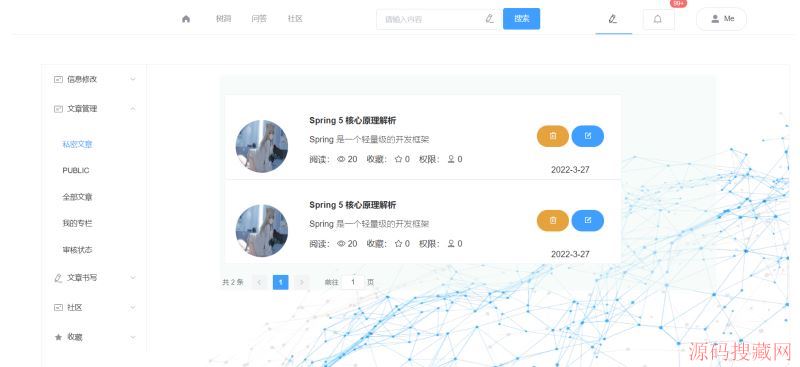
由于都是类似的,所以我直接把那个全部文章的代码拿出来
<template>
<div style="background-color: rgba(239,250,246,0.53)">
<br>
<br>
<div style="width: 80%;margin-left: 1%" class="main">
<el-card shadow="hover" v-for="(message,index) in Messages" :key="index">
<div style="height:100px">
<div style="width:14%;height: 100%;border-radius: 100px;display:inline-block;">
<img
style="width:100%;height: 100%;border-radius: 100px"
src="/static/temporary/headpic.jpg"
class="image"
>
</div>
<div style="display:inline-block;margin-left: 5%;width: 60%">
<p class="message" style="font-weight:bold">{{message.name}}</p>
<p style="font-weight: lighter" class="message"
>
{{message.info}}
</p>
<p class="message">
阅读:
<i class="el-icon-view"></i>
{{message.number}}
收藏:
<i class="el-icon-star-off"></i>
{{message.favorite}}
权限:
<i class="el-icon-coordinate"></i>
{{message.level}}
<i v-if="message.level>=2">fork:{{message.fork}}</i>
</p>
</div>
<div style="width:18%;height: 100%;
display:inline-block;
"
>
<div style="display: inline-block;width: 48%;">
<el-button type="warning" round style="height: 50%;width: 100%;display: inline-block">
<i class="el-icon-delete"></i>
</el-button>
<br><br>
</div>
<div style="display: inline-block;width: 48%">
<el-button type="primary" round style="height: 50%;width: 100%;display: inline-block">
<i class="el-icon-edit-outline"></i>
</el-button>
<br><br>
</div>
<p style="text-align: center">{{message.data}}</p>
</div>
</div>
<br>
</el-card>
</div>
<br>
<div class="footer" style="margin: 0 auto;width: 100%;">
<div class="block" >
<el-pagination
background
layout="total, prev, pager, next, jumper"
:total=total>
</el-pagination>
</div>
</div>
</div>
</template>
<script>
export default {
name: "allArticle",
data(){
return{
total: 999,
Messages:[
{"info":"Spring 是一个轻量级的开发框架",
"name":"Spring 5 核心原理解析",
"number": 999,"data":"2022-3-27",favorite: 999,level: 0,
"fork": 2
},
{"info":"Spring 是一个轻量级的开发框架",
"name":"Spring 5 核心原理解析",
"number": 999,"data":"2022-3-27",favorite: 999,level: 1,
"fork": 2
},
{"info":"Spring 是一个轻量级的开发框架",
"name":"Spring 5 核心原理解析",
"number": 999,"data":"2022-3-27",favorite: 999,level: 2,
"fork": 2
},
{"info":"Spring 是一个轻量级的开发框架",
"name":"Spring 5 核心原理解析",
"number": 999,"data":"2022-3-27",favorite: 999,level: 3,
"fork": 22
},
]
}
},
}
</script>
<style scoped>
.message{
width: 25em;
overflow: hidden;
text-overflow:ellipsis;
white-space: nowrap;
}
</style>
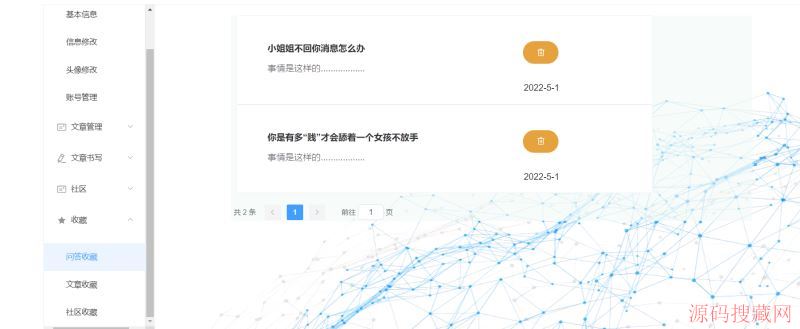
收藏实现
然后是收藏这个也是类似的
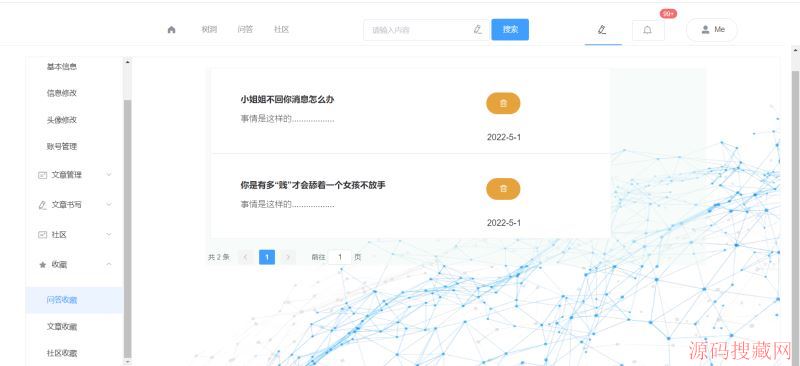
问答收藏
<template>
  <div style="background-color: rgba(239,250,246,0.53)">
    <div style="width: 80%;margin-left: 1%" class="main">
      <el-card shadow="hover" v-for="(message,index) in Messages" :key="index">

        <div style="height:100px">

          <div style="display:inline-block;margin-left: 5%;width: 60%">
            <p class="message" style="font-weight:bold">{{message.name}}</p>
            <p style="font-weight: lighter;color: #46433b" class="message"

            >
              {{message.info}}

            </p>
            <br>

          </div>

          <div  style="width:18%;height: 100%;
            display:inline-block;
          "
          >
            <div style="display: inline-block;width: 50%;margin-top: 20%;margin-left: 24%">
              <el-button type="warning" round style="height: 50%;width: 100%;display: inline-block">
                <i class="el-icon-delete"></i>
              </el-button>
              <br><br>
            </div>
            <p style="text-align: center;">{{message.date}}</p>
          </div>

        </div>
        <br>
      </el-card>
    </div>
    <br>
    <div class="footer" style="margin: 0 auto;width: 100%;">
      <div class="block" >
        <el-pagination
          background
          layout="total, prev, pager, next, jumper"
          :total=total>
        </el-pagination>
      </div>
    </div>

  </div>

</template>

<script>
export default {
  name: "collectionAns",
  data(){
    return{
      total: 2,
      Messages:[
        {"name":"小姐姐不回你消息怎么办",
          "info":"事情是这样的..................",
          "date": "2022-5-1"
        },
        {"name":"你是有多“贱”才会舔着一个女孩不放手",
          "info":"事情是这样的..................",
          "date": "2022-5-1"
        },
      ]
    }
  },
}
</script>

<style scoped>
.message{
  width: 30em;
  overflow: hidden;
  text-overflow:ellipsis;
  white-space: nowrap;
}
</style>
文章收藏
<template>
<div style="background-color: rgba(239,250,246,0.53)">
<br>
<br>
<div style="width: 80%;margin-left: 1%" class="main">
<el-card shadow="hover" v-for="(message,index) in Messages" :key="index">
<div style="height:100px">
<div style="width:14%;height: 100%;border-radius: 100px;display:inline-block;">
<img
style="width:100%;height: 100%;border-radius: 100px"
src="/static/temporary/headpic.jpg"
class="image"
>
</div>
<div style="display:inline-block;margin-left: 5%;width: 60%">
<p class="message" style="font-weight:bold">{{message.name}}</p>
<p style="font-weight: lighter" class="message"
>
{{message.info}}
</p>
<p class="message">
阅读:
<i class="el-icon-view"></i>
{{message.number}}
收藏:
<i class="el-icon-star-off"></i>
{{message.favorite}}
权限:
<i class="el-icon-coordinate"></i>
{{message.level}}
<i v-if="message.level>=2">fork:{{message.fork}}</i>
</p>
</div>
<div style="width:18%;height: 100%;
display:inline-block;
"
>
<div style="display: inline-block;width:80%;height: 100%">
<el-button type="warning" round style="height: 50%;width: 100%;display: inline-block">
<i class="el-icon-delete"></i>
</el-button>
<p style="text-align: center">{{message.data}}</p>
<br>
</div>
</div>
</div>
<br>
</el-card>
</div>
<br>
<div class="footer" style="margin: 0 auto;width: 100%;">
<div class="block" >
<el-pagination
background
layout="total, prev, pager, next, jumper"
:total=total>
</el-pagination>
</div>
</div>
</div>
</template>
<script>
export default {
name: "collectionArticle",
data(){
return{
total: 4,
Messages:[
{"info":"Spring 是一个轻量级的开发框架",
"name":"Spring 5 核心原理解析",
"number": 999,"data":"2022-3-27",favorite: 999,level: 1,
"fork": 2
},
{"info":"Spring 是一个轻量级的开发框架",
"name":"Spring 5 核心原理解析",
"number": 999,"data":"2022-3-27",favorite: 999,level: 1,
"fork": 2
},
{"info":"Spring 是一个轻量级的开发框架",
"name":"Spring 5 核心原理解析",
"number": 999,"data":"2022-3-27",favorite: 999,level: 2,
"fork": 2
},
{"info":"Spring 是一个轻量级的开发框架",
"name":"Spring 5 核心原理解析",
"number": 999,"data":"2022-3-27",favorite: 999,level: 3,
"fork": 2,
},
]
}
},
}
</script>
<style scoped>
.message{
width: 25em;
overflow: hidden;
text-overflow:ellipsis;
white-space: nowrap;
}
</style>
后面那个社区收藏是和问答收藏类似的,所以就这样了。
总结
其实做这个东西用组件开发是很快的,麻烦的就是美感,怎么放置,后面就好办了,写你的小接口,和后端打交道,其实看目前的前端视图也知道,功能很多,目前为了便于维护也是要走分布式架构的,这次我想玩玩多语言开发~
到此这篇关于如何使用Vue+Element做个个人中心的文章就介绍到这了,更多相关Vue+Element个人中心内容请搜索源码搜藏网以前的文章或继续浏览下面的相关文章希望大家以后多多支持源码搜藏网!
【JQ】无限滚动条-jquery.infinitescroll.j
query多选下拉框插件 jquery-multiselect(
手机站jQuery自动完成插件autoComplete.js
js/jQuery教程阅读排行
-

【JQ】无限滚动条-jquery.infinitescroll.js使用说明
2014-05-05
-
query多选下拉框插件 jquery-multiselect(修改)
2014-06-15
-
2016-06-15
-
毕向东Html、css、JavaScript视频教程(黑马程序员课程)
2013-04-25
-

手机站jQuery自动完成插件autoComplete.js
2016-02-25
-
2012-08-23
-
2013-04-25
-
2013-04-25
最新文章
-
2022-06-06
-
2022-06-06
-

2022-06-06
-

2022-06-06
-

2022-06-06
-

2022-06-06
-
2022-06-06
-
2022-06-06
热门源码
