Androidstudio调用摄像头拍照并保存照片
本文实例为大家分享了Androidstudio调用摄像头拍照并保存照片的具体代码,供大家参考,具体内容如下
首先在manifest.xmlns文件中声明权限
<?xml version="1.0" encoding="utf-8"?>
<manifest xmlns:android="http://schemas.android.com/apk/res/android"
? ? package="com.example.takephoto">
?
? ? <application
? ? ? ? android:requestLegacyExternalStorage="true"
? ? ? ? android:allowBackup="true"
? ? ? ? android:icon="@mipmap/ic_launcher"
? ? ? ? android:label="@string/app_name"
? ? ? ? android:roundIcon="@mipmap/ic_launcher_round"
? ? ? ? android:supportsRtl="true"
? ? ? ? android:theme="@style/Theme.TakePhoto">
? ? ? ? <activity android:name=".MainActivity">
? ? ? ? ? ? <intent-filter>
? ? ? ? ? ? ? ? <action android:name="android.intent.action.MAIN" />
?
? ? ? ? ? ? ? ? <category android:name="android.intent.category.LAUNCHER" />
? ? ? ? ? ? </intent-filter>
? ? ? ? </activity>
? ? ? ? <provider
? ? ? ? ? ? android:authorities="com.example.takephoto.fileprovider"
? ? ? ? ? ? android:name="androidx.core.content.FileProvider"
? ? ? ? ? ? android:exported="false"
? ? ? ? ? ? android:grantUriPermissions="true">
? ? ? ? <meta-data
? ? ? ? ? ? android:name="android.support.FILE_PROVIDER_PATHS"
? ? ? ? ? ? android:resource="@xml/file_paths"/>
? ? ? ? </provider>
? ? </application>
? ? <uses-permission android:name="android.permission.READ_EXTERNAL_STORAGE"/>
? ? ? ? <uses-permission android:name="android.permission.WRITE_EXTERNAL_STORAGE"/>
?
</manifest>
在其中我们创建了一个文件夹,文件夹名字叫做xml,下面存放了file_paths这样一个文件
path.xml文件中存放的代码为
<?xml version="1.0" encoding="utf-8"?>
<paths xmlns:android="http://schemas.android.com/apk/res/android">
? ? <external-path
? ? ? ? name="my_images"
? ? ? ? path="."/>
?
</paths>
来到主方法中的布局文件,只需要简单的一个按钮就可以实现,为了将照片显示出来,添加一个imgview来将照片显示在手机上
布局文件:
<?xml version="1.0" encoding="utf-8"?>
<LinearLayout xmlns:android="http://schemas.android.com/apk/res/android"
? ? xmlns:app="http://schemas.android.com/apk/res-auto"
? ? xmlns:tools="http://schemas.android.com/tools"
? ? android:layout_width="match_parent"
? ? android:layout_height="match_parent"
? ? android:orientation="vertical"
? ? tools:context=".MainActivity">
?
? ? <Button
? ? ? ? android:layout_width="match_parent"
? ? ? ? android:layout_height="wrap_content"
? ? ? ? android:text="??"
? ? ? ? android:id="@+id/btn_takephoto"/>
? ? <ImageView
? ? ? ? android:layout_width="match_parent"
? ? ? ? android:layout_height="wrap_content"
? ? ? ? android:id="@+id/img_photo"/>
?
</LinearLayout>
主方法中只需要将按钮的点击事件跳转到Android自带的系统相机就可以
package com.example.takephoto;
?
import androidx.appcompat.app.AppCompatActivity;
import androidx.core.content.FileProvider;
?
import android.content.Intent;
import android.content.RestrictionEntry;
import android.graphics.Bitmap;
import android.graphics.BitmapFactory;
import android.net.Uri;
import android.os.Build;
import android.os.Bundle;
import android.provider.MediaStore;
import android.view.View;
import android.widget.Button;
import android.widget.ImageView;
?
import java.io.File;
import java.io.FileNotFoundException;
import java.io.IOException;
?
public class MainActivity extends AppCompatActivity {
? ? final int TAKE_PHOTO=1;
? ? ImageView iv_photo;
? ? Uri imageUri;
? ? @Override
? ? protected void onCreate(Bundle savedInstanceState) {
? ? ? ? super.onCreate(savedInstanceState);
? ? ? ? setContentView(R.layout.activity_main);
? ? ? ? Button btn_1=findViewById(R.id.btn_takephoto);
? ? ? ? iv_photo=findViewById(R.id.img_photo);
? ? ? ? btn_1.setOnClickListener(new View.OnClickListener() {
? ? ? ? ? ? @Override
? ? ? ? ? ? public void onClick(View v) {
? ? ? ? ? ? ? ? File output=new File(getExternalCacheDir(),"output_image.jpg");
? ? ? ? ? ? ? ? try {
? ? ? ? ? ? ? ? ? ? if (output.exists()){
? ? ? ? ? ? ? ? ? ? ? ? output.delete();
? ? ? ? ? ? ? ? ? ? }
? ? ? ? ? ? ? ? ? ? output.createNewFile();
? ? ? ? ? ? ? ? }catch (IOException e){
? ? ? ? ? ? ? ? ? ? e.printStackTrace();
? ? ? ? ? ? ? ? }
? ? ? ? ? ? ? ? if (Build.VERSION.SDK_INT>=24){
//图片的保存路径
? ? ? ? ? ? ? ? ? ? imageUri= FileProvider.getUriForFile(MainActivity.this,"com.example.takephoto.fileprovider",output);
? ? ? ? ? ? ? ? }
? ? ? ? ? ? ? ? else { imageUri=Uri.fromFile(output);}
? ? ? ? ? ? ? ? //跳转界面到系统自带的拍照界面
? ? ? ? ? ? ? ? Intent intent=new Intent("android.media.action.IMAGE_CAPTURE");
? ? ? ? ? ? ? ? intent.putExtra(MediaStore.EXTRA_OUTPUT,imageUri);
? ? ? ? ? ? ? ? startActivityForResult(intent,TAKE_PHOTO);
? ? ? ? ? ? }
? ? ? ? });
? ? }
? ? protected ?void onActivityResult(int requestCode,int resultCode,Intent data) {
? ? ? ? super.onActivityResult(requestCode, resultCode, data);
? ? ? ? switch (requestCode){
? ? ? ? ? ? case TAKE_PHOTO:
? ? ? ? ? ? ? ? if (resultCode==RESULT_OK){
? ? ? ? ? ? ? ? ? ? // 使用try让程序运行在内报错
? ? ? ? ? ? ? ? ? ? try {
? ? ? ? ? ? ? ? ? ? ? ? //将图片保存
? ? ? ? ? ? ? ? ? ? ? ? Bitmap bitmap= BitmapFactory.decodeStream(getContentResolver().openInputStream(imageUri));
? ? ? ? ? ? ? ? ? ? ? ? iv_photo.setImageBitmap(bitmap);
? ? ? ? ? ? ? ? ? ? }catch (FileNotFoundException e){
? ? ? ? ? ? ? ? ? ? ? ? e.printStackTrace();
? ? ? ? ? ? ? ? ? ? }
? ? ? ? ? ? ? ? }
? ? ? ? ? ? ? ? break;
? ? ? ? ? ? default:break;
? ? ? ? }
? ? }
?
}
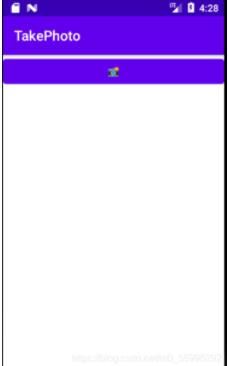
运行效果:

点击按钮后:

选择确定后:

以上就是本文的全部内容,希望对大家的学习有所帮助,也希望大家多多支持源码搜藏网。
手机开发阅读排行
-

安卓开发复习笔记――Fragment+FragmentTabHost组件(实现新浪微
2016-09-26
-

2014年最新720多套Android源码2.0GB免费一次性打包下载
2016-01-01
-

开源直播系统源码功能一览表(含ios+android+服务端+后台)
2019-10-24
-
2019-09-12
-
2019-09-26
-
2019-09-24
-

直播源码的崛起的巅峰:布谷一对一视频直播的蓬勃发展让您见证了
2019-09-25
-
2019-09-23
最新文章
-
2022-03-29
-

AndriodStudio使用listview实现简单图书管理
2022-03-29
-

2022-03-29
-
AndriodStudio利用ListView和数据库实现简单学生管理
2022-03-29
-
2022-03-29
-
2022-03-29
-
AndroidBLE蓝牙开发之实现扫码枪基于BLESSED开发
2022-03-29
-
2022-03-29
热门源码
