手把手教你做安豆计算器(二)-计算器界面布局
第3节 计算器界面布局
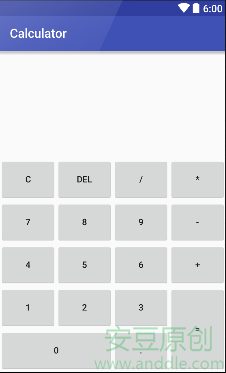
现在起,我们就开始正式开发“计算器”应用。这一节,我们将完成计算器的界面布局,让它初具计算器的模样。
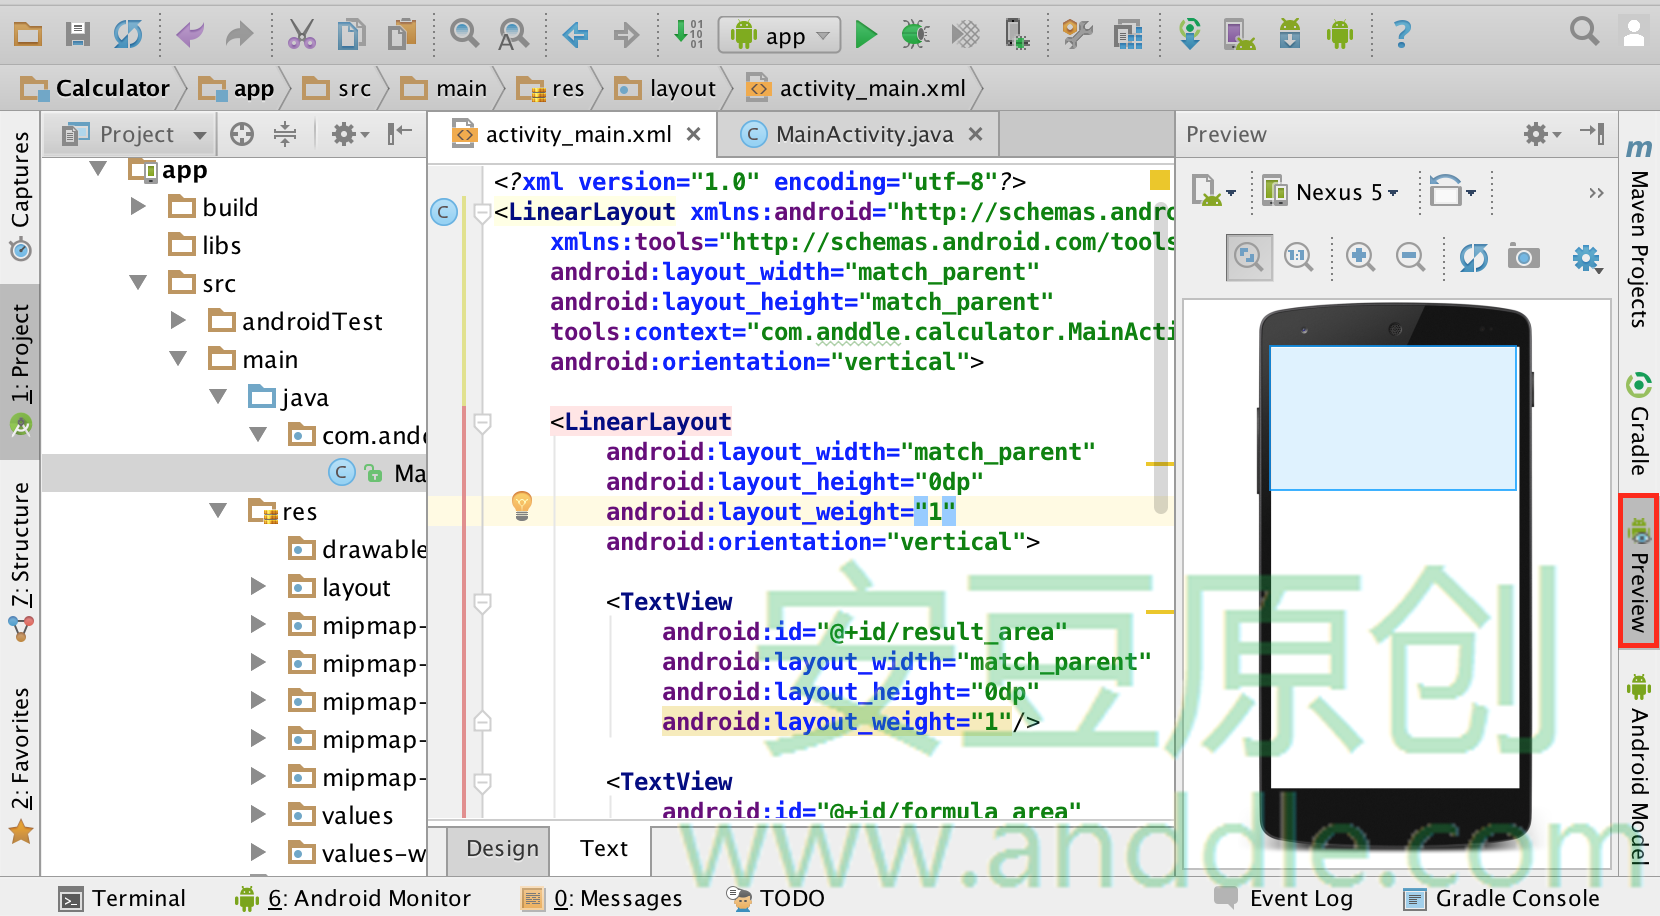
计算器界面是通过布局文件定义的。它位于项目的res\layout\activity_main.xml文件中。
这个布局文件通过java源代码MainActivity.java中的setContentView()函数,设置到界面上。
@Override
protected void onCreate(Bundle savedInstanceState) {
        super.onCreate(savedInstanceState);
        setContentView(R.layout.activity_main);
}
接下来,我们的界面布局,就会在这个布局文件activity_main.xml中进行。
在修改布局文件的过程中,可以通过Preview功能,来实时观看我们修改的界面布局效果。
3.1 上下段布局
首先确定布局形式。界面分为两个大区域,上半区域显示计算表达式和计算结果,下半区域显示键盘。
- 两个区域一上一下,呈线型排列,因此我们选择
LinearLayout布局; - 通过将
LinearLayout的android:orientation属性设置成vertical来将它包含的内容以竖直方式排列; - 整个界面将尽可能占用整个屏幕,因此使用
match_parent指定布局的宽度和高度。match_parent说明尺寸要尽可能的大。
<LinearLayout xmlns:android="http://schemas.android.com/apk/res/android"    xmlns:tools="http://schemas.android.com/tools"
    android:layout_width="match_parent"
    android:layout_height="match_parent"
    android:paddingBottom="@dimen/activity_vertical_margin"
    android:paddingLeft="@dimen/activity_horizontal_margin"
    android:paddingRight="@dimen/activity_horizontal_margin"
    android:paddingTop="@dimen/activity_vertical_margin"
    android:orientation="vertical"
    tools:context="com.anddle.calculator.MainActivity">
</LinearLayout>- 上半区域包含了表达式区域和计算结果区域,它们也成竖直排列,所以还需要一个
LinearLayout包含它们。上半区域占整个界面的1/3,就要将android:layout_weight设置成1,android:layout_height设置成0dp; - 下半区域是键盘的显示区域,我们也选用LinearLayout作为这个区域的布局。下半区域占整个界面的2/3,就要将
android:layout_weight设置成2,android:layout_height设置成0dp;
这样的设置说明,要将父布局剩余的空间平均分成1+2=3份,上半区域分得1/3,下半区域分的2/3。所谓空余的空间就是:父布局的空间,被子布局的空间占用后,所剩余的空间。
布局文件中,我们将现实区域和键盘区域的高度都设置成了0dp,说明它们在竖直方向上不占用任何空间,但是又设置了layout_weight,说明它们要按照父控件match_parent占用的高度来按比例分配。
<LinearLayout xmlns:android="http://schemas.android.com/apk/res/android"
    xmlns:tools="http://schemas.android.com/tools"
    android:layout_width="match_parent"
    android:layout_height="match_parent"
    android:paddingBottom="@dimen/activity_vertical_margin"
    android:paddingLeft="@dimen/activity_horizontal_margin"
    android:paddingRight="@dimen/activity_horizontal_margin"
    android:paddingTop="@dimen/activity_vertical_margin"
    android:orientation="vertical"
    tools:context="com.anddle.calculator.MainActivity">

    <LinearLayout
        android:layout_width="match_parent"
        android:layout_height="0dp"
        android:layout_weight="1"/>

    <LinearLayout
        android:layout_width="match_parent"
        android:layout_height="0dp"
        android:layout_weight="2"/>

</LinearLayout>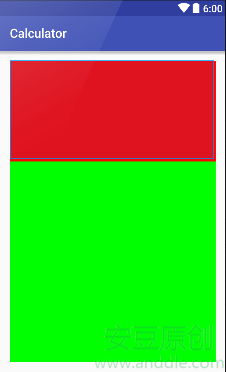
/*******************************************************************/
* 版权声明
* 本教程只在CSDN和安豆网发布,其他网站出现本教程均属侵权。
/*******************************************************************/
3.2 显示区域布局
结果区域和表达式区域一上一下,各占一半空间,用来显示文字内容。它们可以使用TextView控件来实现。
- 为结果区域指定
android:id为result_area,android:layout_weight设置成1,android:layout_height设置成0dp; - 为表达式区域指定
android:id为formula_area,android:layout_weight设置成1,android:layout_height设置成0dp;
设置了id,我们以后就可以在代码中,通过这id来获取并使用这个控件了。 - 包含结果区域和表达式区域的
LinearLayout设置android:orientation属性为vertical,让它们竖直排列 - 为了祛除界面上四个边的空白,我们还要移除最外层
LinearLayout的android:paddingXXXX这几个属性,让整个界面填满显示区域。
<LinearLayout xmlns:android="http://schemas.android.com/apk/res/android"
    xmlns:tools="http://schemas.android.com/tools"
    android:layout_width="match_parent"
    android:layout_height="match_parent"
    android:orientation="vertical"
    tools:context="com.anddle.calculator.MainActivity">

    <LinearLayout
        android:layout_width="match_parent"
        android:layout_height="0dp"
        android:layout_weight="1"
        android:orientation="vertical"/>

        <TextView
            android:id="@+id/result_area"
            android:layout_width="match_parent"
            android:layout_height="0dp"
            android:layout_weight="1"/>

        <TextView
            android:id="@+id/formula_area"
            android:layout_width="match_parent"
            android:layout_height="0dp"
            android:layout_weight="1"/>

    </LinearLayout>

    <LinearLayout
        android:layout_width="match_parent"
        android:layout_height="0dp"
        android:layout_weight="2"/>

</LinearLayout>
3.3 键盘区域布局
键盘布局可以进一步分成左右两个区域,
- 左边区域是
CDEL/0-9以及.; - 右边区域是
*-+=。
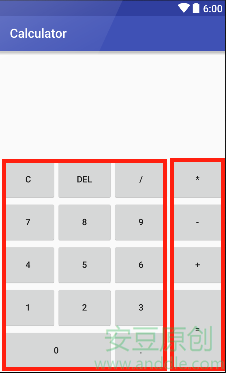
这两个区域,可以同样使用水平排列的LinearLayout作为它们的父布局,
- 左边区域像个表格,可以使用
TableLayout,让它占据3个单位的宽度,android:layout_weight设置成3,android:layout_width设置成0dp; - 右边区域就是一个简单的竖直排列的
LinearLayout,让它占据1个单位的宽度,也就是android:layout_weight设置成1,android:layout_width设置成0dp;
<LinearLayout
    android:layout_width="match_parent"
    android:layout_height="0dp"
    android:layout_weight="2">

    <TableLayout
        android:layout_width="0dp"
        android:layout_height="match_parent"
        android:layout_weight="3"/>

    <LinearLayout
        android:layout_width="0dp"
        android:layout_height="match_parent"
        android:layout_weight="1"/>

</LinearLayout>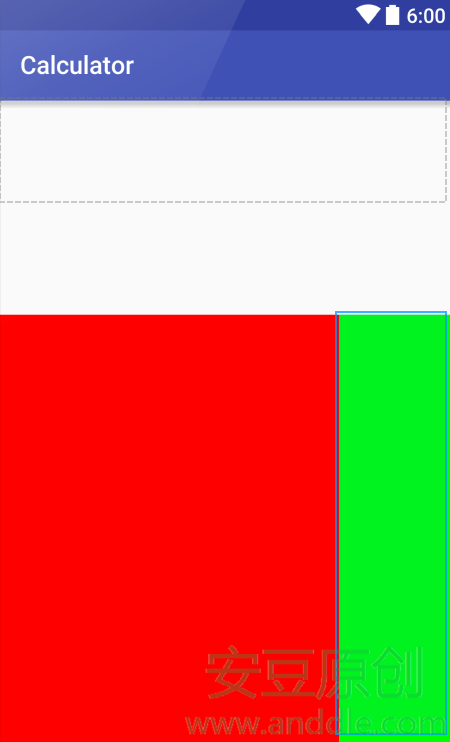
3.3.1 键盘左区域布局
键盘按钮分成3*5格,每一格就是一个按钮,这就像是一个表格,所以我们选用了TableLayout作为它们的布局。
- 每一行用
TableRow表示,它是与TableLayout配合使用的布局,用来表示表格的每一行;这里有5行,就添加5个TableRow; TableRow在默认情况下,会假定android:layout_width为match_parent,android:layout_height为wrap_content,我们就简单的在这里设置一个android:layout_weight为1;
<TableLayout
    android:layout_width="0dp"
    android:layout_height="match_parent"
    android:layout_weight="3">

    <TableRow android:layout_weight="1">
    </TableRow>

    <TableRow android:layout_weight="1">
    </TableRow>

    <TableRow android:layout_weight="1">
    </TableRow>

    <TableRow android:layout_weight="1">
    </TableRow>

    <TableRow android:layout_weight="1">
    </TableRow>

</TableLayout>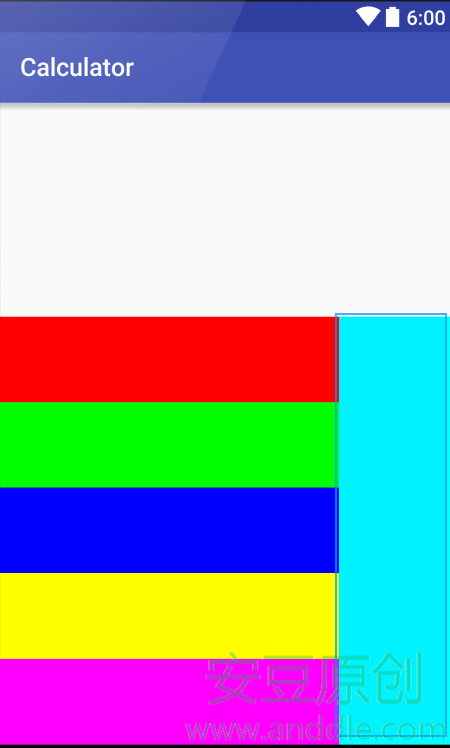
键盘上的按钮可以使用Android SDK提供的Button控件,
- 通过
android:text属性为每个Button设置需要显示的内容; - 为它们各自的
android:id取上对应的id名字; - 每一行的
Button还是按照相等的比例进行分配,android:layout_width设置成0dp,android:layout_weight设置成1,android:layout_height设置成match_parent。 - 最后一行中的‘0’按钮,它要占据两列的宽度,我们可以将这个
Button控件的android:layout_weight设置成2,就能让它能够占据2格的位置了;
<TableLayout
    android:layout_width="0dp"
    android:layout_height="match_parent"
    android:layout_weight="3">

    <TableRow android:layout_weight="1">
        <Button android:id="@+id/btn_c" android:text="C"
                android:layout_weight="1"
                android:layout_width="0dp"
                android:layout_height="match_parent"/>
        <Button android:id="@+id/btn_del" android:text="DEL"
                android:layout_weight="1"
                android:layout_width="0dp"
                android:layout_height="match_parent"/>
        <Button android:id="@+id/btn_div" android:text="/"
                android:layout_weight="1"
                android:layout_width="0dp"
                android:layout_height="match_parent"/>
    </TableRow>

    <TableRow android:layout_weight="1">
        <Button android:id="@+id/btn_7" android:text="7"
                android:layout_weight="1"
                android:layout_width="0dp"
                android:layout_height="match_parent"/>
        <Button android:id="@+id/btn_8" android:text="8"
                android:layout_weight="1"
                android:layout_width="0dp"
                android:layout_height="match_parent"/>
        <Button android:id="@+id/btn_9" android:text="9"
                android:layout_weight="1"
                android:layout_width="0dp"
                android:layout_height="match_parent"/>
    </TableRow>

    <TableRow android:layout_weight="1">
        <Button android:id="@+id/btn_4" android:text="4"
                android:layout_weight="1"
                android:layout_width="0dp"
                android:layout_height="match_parent"/>
        <Button android:id="@+id/btn_5" android:text="5"
                android:layout_weight="1"
                android:layout_width="0dp"
                android:layout_height="match_parent"/>
        <Button android:id="@+id/btn_6" android:text="6"
                android:layout_weight="1"
                android:layout_width="0dp"
                android:layout_height="match_parent"/>
    </TableRow>

    <TableRow android:layout_weight="1">
        <Button android:id="@+id/btn_1" android:text="1"
                android:layout_weight="1"
                android:layout_width="0dp"
                android:layout_height="match_parent"/>
        <Button android:id="@+id/btn_2" android:text="2"
                android:layout_weight="1"
                android:layout_width="0dp"
                android:layout_height="match_parent"/>
        <Button android:id="@+id/btn_3" android:text="3"
                android:layout_weight="1"
                android:layout_width="0dp"
                android:layout_height="match_parent"/>
    </TableRow>

    <TableRow android:layout_weight="1">
        <Button android:id="@+id/btn_0" android:text="0"
                android:layout_weight="2"
                android:layout_width="0dp"
                android:layout_height="match_parent"/>
        <Button android:id="@+id/btn_dot" android:text="."
                android:layout_weight="1"
                android:layout_width="0dp"
                android:layout_height="match_parent"/>
    </TableRow>

</TableLayout>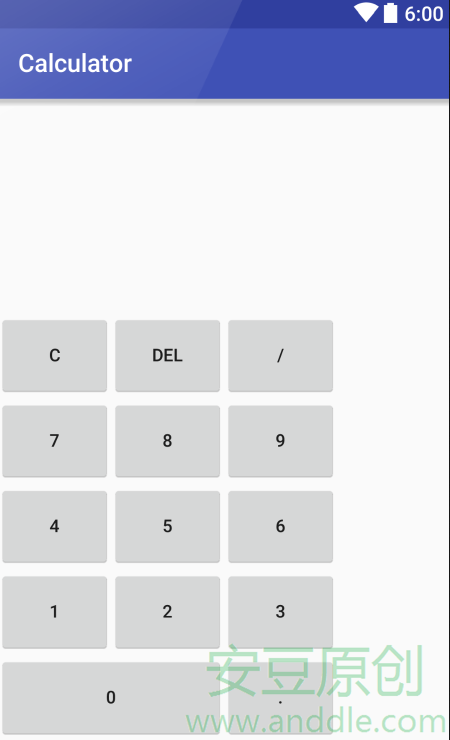
3.3.2 键盘右区域布局
最后,我们将键盘右边区域的按钮添加上。
- 让
Button竖直排列,就要将包裹它们的LinearLayout设置android:orientation成vertical; - 这一列的
Button还是按照相等的比例进行分配,所以android:layout_height设置成0dp,android:layout_weight设置成1,android:layout_width设置成match_parent。
<LinearLayout
    android:layout_width="0dp"
    android:layout_height="match_parent"
    android:layout_weight="1"
    android:orientation="vertical">

    <Button android:id="@+id/btn_mul" android:text="*"
            android:layout_weight="1"
            android:layout_width="match_parent"
            android:layout_height="0dp"/>
    <Button android:id="@+id/btn_sub" android:text="-"
            android:layout_weight="1"
            android:layout_width="match_parent"
            android:layout_height="0dp"/>
    <Button android:id="@+id/btn_add" android:text="+"
            android:layout_weight="1"
            android:layout_width="match_parent"
            android:layout_height="0dp"/>
    <Button android:id="@+id/btn_equ" android:text="="
            android:layout_weight="1"
            android:layout_width="match_parent"
            android:layout_height="0dp"/>

</LinearLayout>
至此,计算器的界面布局就完成了。
- 顶
- 0
- 踩
- 0
手机开发阅读排行
-

安卓开发复习笔记――Fragment+FragmentTabHost组件(实现新浪微
2016-09-26
-

2014年最新720多套Android源码2.0GB免费一次性打包下载
2016-01-01
-

开源直播系统源码功能一览表(含ios+android+服务端+后台)
2019-10-24
-
2019-09-26
-
2019-09-12
-
2019-09-24
-

直播源码的崛起的巅峰:布谷一对一视频直播的蓬勃发展让您见证了
2019-09-25
-
2019-09-23
最新文章
-

2022-03-16
-
2022-03-16
-
Android开发使用WebView打造webapp示例代码
2022-03-16
-

2022-03-16
-
开源直播系统源码功能一览表(含ios+android+服务端+后台)
2019-10-24
-
2019-10-22
-
2019-09-26
-
直播源码的崛起的巅峰:布谷一对一视频直播的蓬勃发展让您见证了
2019-09-25
热门源码
